Handbok Chaufförsklienten (The Driver Client Manual)
Senast uppdaterad: 2025-12-17
Introduction
Chaufförsklienten (The Driver Client) is a part of Mätplatsstödet (The Measurement Site System) and is a web-based system. Chaufförsklienten is a part of Mätplatsstödet (The Measurement Site System), which the drivers have access to. Each driver must have their own unique login/user account to be able to measure VIOL 3.
Through Chaufförsklienten (The Driver Client), the driver can notify a Leveranstillfälle (Delivery opportunity), combine one or more deliveries, and follow up on the submitted transport information afterwards. If the driver does not have a login/user account, the driver cannot access Chaufförsklienten (The Driver Client), and it is only possible to measure if there is a Mätare (Measurer) available.
Ordering of Användare (Users) for Chaufförsklienten (The Driver Client) - Authorization Manager
Each driver must have their own Användarkonto (User account) in Chaufförsklienten (The Driver Client). The user has different levels of permissions associated with the Driver. These levels determine what permissions and capabilities users have to perform certain tasks during the measurement process.
Examples of such rights are:
- Chaufförsgodkänd mottagningskontroll (Driver-approved incoming inspection).
- Chaufförsgodkänd mätning (Driver-approved measurement).
If the driver has permission to perform a certain measurement service, the measurement service will be available to the driver in Chaufförsklienten (The Driver Client).
The Authorization Manager at the executing transport company orders authorizations for their drivers.
Does the driver drive for several transport companies?
The driver needs to contact the Authorization manager at all the transport companies that the driver intends to drive for and obtain the necessary access. Alternatively, the Authorization Manager needs to add drivers who they know will drive for the company, even if it is only sporadically. It is the Authorization Manager who is responsible for removing/deregistering drivers who no longer drive for the company.
Log in to Chaufförsklienten (The Driver Client)
When you have received an invitation from Biometria that your account is active, read this instruction to know what account type your email address has when you log in for the first time. Also how to log in to Chaufförsklienten (The Driver Client).
You will need an Authenticator app for a two-step verification for your Biometria account. See instructions.
Select an Entity (Aktör) after logging in
If you are driving for several execution companies, a dialogue box will appear, and you need to select the executing transport company you are driving for today.
Select Utförande företag (Transport Company) and click Välj (Select). See image 1.
This dialogue box will not appear if you only have authorization for one performing company.
Image 1

In the right corner, you will see the name of the driver you are logged in as. In this case, the driver's name is Tina Transportor (Image 2).
Image 2

To see which Utförande företag (Transport Company), you are logged in for, you need to click on the underlined name (Tina Transportor).
When you click on the name Tina Transportor, a green box will appear with information about the name of the Driver and Utförande företag (Transport Company) (Image 3).
Image 3

Settings in Chaufförsklienten (The Driver Client)
Click on the three lines, also called "hamburger menu", in the left corner, see the green arrow (Image 1).
Image 1

At the bottom of the view, you will find the support number for Biometria (Image 2).
(+46) 10-228 50 00
Image 2

- Snabbguide (Quick guide) – If you click on Snabbguide (Quick guide), you will get a shorter version of Handbok Chaufförsklienten (The Driver Client manual).
- Byt roll (Change role) - Only included in the list if you have multiple performing companies. Here you can change the executing company.
- Logga ut (Log out) - You log out of Chaufförsklienten (The Driver Client).
It is important that you log out of Chaufförsklienten (The Driver Client), if there are several people using the same device or if you log in to the computer in “Kuren” (Driver Terminal at a measurement site). This is because we don’t want anyone else to use your user and make a drop-off.
If you click on Mina inställningar (My settings), you will see the environment shown in image 3.
Image 3

- Skicka leveranskvitto till mig (Send Delivery receipt to me) - If the default setting is Ja (Yes), it means that the receipt will be sent to the logged-in email in Handbok Chaufförsklienten (The Driver client). See image 4.
Image 4

- Display Mode – Default is Ljust (Light). See image 3 above.
Since transport does not always take place when it is light outside and screens can affect the Driver's night vision, a dark mode has been introduced where the colors are much darker to prevent the screen from glare.
- Select dark mode by selecting Mörkt (Dark). See image 5.
Image 5

Tools in Chaufförsklienten (The Driver Client)
A text to guide you (Hjälptext)
Below the text, there is a dotted line. A text to guide you, will appear, if you click on the dotted line or hover over it with your mouse cursor (Image 1).
Image 1

If you click on words and sentences that have a grey underline, you will be taken to a new view (Image 2).
Image 2

The meaning of the colours
There are colours in the system to make it easier. In image 3, you can see a border that has different colors. The meaning of the colours:
- Green colour - Activity/work step ready. You don't have to do anything.
- Orange colour - You are going to carry out an activity/work item.
- Grey colour - There are activities/work steps that must be completed first, before this becomes available.
- Blue colour - Activity/work steps that are available and optional to perform. Delivery receipt is optional to print.
Placards at drop-off or receipts at random checks are not optional work steps even though they are under blue paint.
- Red colour - Forced fields for information to be filled in (Image 4).
Image 3

You can also see the colours around the fields that you are going to click or type in (Image 4).
Image 4

Your vehicle combination must be posted in Mina ekipage (My Vehicle Combinations)
In VIOL 3 the Transportnummer (Transport Number) has been removed. This is replaced by a registration number of the vehicle Combination and by specifying which Utförande transportföretag (The Carrier) is performing the transport. The Huvudkod (Main code) of the Utförande transportföretag (The Carrier) must be registered in Aktörsregistret (The Entity register) at Biometria, for the entity to be included in Chaufförsklienten (The Driver Client).
In order to make a delivery in Chaufförsklienten (The Driver Client), the vehicle combination must be posted in Mina ekipage (My Vehicle Combinations). This also applies if you Leveransaviserar (Notifying deliveries) from an external system.
New Driver user and add a Vehicle combination to Mina ekipage (My Vehicle combinations)
After logging in you need to upload your Ekipage (Vehicle combination) and save it under Mina ekipage (My Vehicle combinations). You do this by clicking on Administrera mina ekipage (Administer my vehicle combinations). See image 1.
Image 1

In Ekipagekombinationer, (the Vehicle combination box), you can search for all the vehicle combinations that are available in Chaufförsklienten (The Driver Client) manual and Mätplatsstödet (MPS) (The Measurement Site System). See image 2.
Image 2

In the box, you can search and get all the registration numbers for tractor units, tractor units with trailers, and trailers that are in the system Chaufförsklienten (The Driver client).
Enter two characters in the search box, for example two A (AA) and all of the tractor units, tractor units with trailers, and trailers will appear (Image 3).
In the drop-down bar on the edge, you can scroll down to find your vehicle combination (Image 4).
If you add additional characters to the search box, the selection of combinations in the list will be reduced (Image 5).
Image 3

Image 4

Image 5

If your vehicle combination is not in the search box, read more in chapter The Vehicle combination is not in Chaufförsklienten (The Driver Client) - Register a new vehicle combination. Here are some examples of when you need to go to a chapter. The vehicle combination is not in Chaufförsklienten (The Driver client) - Register a new vehicle combination.
Examples of use cases:
- Your registration number does not appear in the box on tractor unit + trailer.
- The registration number of the tractor unit is available, but not combined with the correct registration number with the trailer.
- The registration number is available on the tractor but not on the trailer.
- The registration number is on the trailer but not on the tractor.
- The Vehicle exists but it is the wrong country.
Observe! We only support two registration numbers on a vehicle combination. A tractor registration number and a trailer registration number. For more information, read the documentation on Information about Vehicle Combination types. (Information om Ekipagetyper).
Choose the vehicle combination that matches your car and trailer registration number. Click Spara (Save) for the combination to be saved to Mina Ekipage (My Vehicle combination). See image 6.
You can add several vehicle combinations under Mina ekipage (My Vehicle combination).
If you change the trailer on the tractor, this is a new Vehicle combination that must be set up.
Image 6

Now the vehicle combination is in Mina Ekipage (My Vehicle combinations). See image 7.
Image 7

In Mina ekipage (My Vehicle combinations) you have an overview of each vehicle combination. You can see the maximum weight and status of the vehicle combination and whether Bankarna (The bunks) are Krönta (Crowned). Krönta skäppor (Crowned bushels) are not shown (Image 8).
Image 8

When you choose a vehicle combination, information about the combination will appear (Image 9).
It is important that you check that the information about the tractor unit and trailers is correct.
Image 9

Incorrect Maxvikt (Maximum weight) on the Ekipage (Vehicle combination) can affect Transportprisräkningen (The transport price bill), depending on what the agreements look like.
If you state a different maximum weight in the transport data (road icon) in Chaufförsklienten (The Driver Client), than the weight stated in Ekipageregistret (The vehicle combination register), (Image 10), it is the weight in the transport data that will be submitted to the system.
If you submit transport information from a transport management system, it is the maximum weight from the transport management system that applies and is submitted to Affärssystemet (The business system).
If you have set different weights in the external system and in Chaufförsklienten (The Driver Client), the maximum weights may differ.
If Befraktaren (The The Original Logistics Buyer Agent) has set Ekipagekontrollen (Vehicle combination control) to Ja (Yes), the maximum weight that has been saved in the system will be the governing factor in the price lists.
If Ekipagekontrollen (Vehicle Combination control) is set to Nej (No), it will be calculated on the maximum weight that comes from Chaufförsklienten (The Driver Client transport information), or by the Transportledningssystemet (Transport management system).
Image 10

In the Kran & vikt (Crane & weight box), you can see the setting of the crane and whether there is a crane weight (Image 11).
The box says Ibland (Sometimes), and 2 ton (2 tons).
Ibland (Sometimes) indicates that you have a removable crane. Meaning, that you have to state at each delivery whether you have a crane or not when the measurement occurs.
2 ton (2 tons) is the weight of the crane.
It is Mätaren (The Measurer) that enters the weight of the crane into Chaufförsklienten (The Driver Client). You can change the setting on the tap, read more in chapter Always crane, Never crane, Sometimes crane, how to do it.
If information about Kran (The Crane), is incorrect, it affects the load weight of raw material and transport price calculation. This applies to both the weight of the crane and how you state that you have a crane or not at the weigh-in.
Image 11

Krönt ekipage och kröningsdatum (Crowned vehicle combination and crown date)
The crowning date is the date on which an inspector crowned the bunks, and Yes or No indicates whether they are crowned. At the moment, we only display Bankar (Bunks) that are crowned and not any Skäppor (Load units).
Image 12

Click Bakåt (Back) to return to the home page (Image 13).
Image 13

The latest added Vehicle combination (ekipaget) is at the top and by clicking on the "arrow" you will get all your Vehicle combinations in the drop-down list, which is posted under Mina ekipage (My Vehicle combinations). See Image 14.
Image 14

The Vehicle combination is not in Chaufförsklienten (The Driver Client) - Register a new vehicle combination
You search for a vehicle combination in the search box to add it to Mina ekipage (My Vehicle combinations) and the vehicle combination is not available as an option (Image 1). You will then need to set up a new vehicle combination.
Is the tractor unit available, but not the trailer? Then you need to set up a new vehicle combination.
Image 1

Click on Registrera nytt ekipage (Register new vehicle combination). See Image 2.
Image 2

Fill in your Registration number (Dragbil, reg nr.) on the tractor unit (Image 3).
Image 3

Sweden is pre-filled. If you click on the arrow in the box, a drop-down list will appear that allows you to change the country of the tractor unit (Image 4).
Image 4

Fill in Kran (Crane) on the tractor unit (Image 5).
- Alltid (Always) - An attached crane on the tractor unit
- Ibland (Sometimes) - Detachable crane
- Aldrig (Never) - There is no crane on the tractor unit
Image 5

Fill in Fordonstyp (Vehicle type) on the tractor (Image 6).
- Lastväxlare (Hook lift truck) - The tractor unit does not have Bankar (Bunks), Fast skäppa (Fixed Load unit), no Skäppa ID (Load unit ID) or Skäppa ID ibland (Load unit ID sometimes). In cases where there is Skäppa ID ibland (Load unit ID sometimes), you need to enter the Skäppa ID (Load unit ID) when there is a measurement flow with Skäppmätning (Fixed container measurement).
- Banke (Bunks)
- Fast Skäppa (Fixed Load unit)
Image 6

If you choose Fast Skäppa (Fixed Load unit), you must state Skäppa ID (Fixed Load ID) as Skäppan (The Load unit). See image 7.
The Skäppa ID (Fixed Load ID) that you choose will be given as a default when you are to Leveransavisera (Deliver the notification). It is possible to change Aviseringsläget (The notification mode).
Image 7

Select the number of trailers by pressing + or – (Image 8).
Image 8

Fill in your Registreringsnummer (Registration number) on trailer 1 (Image 9).
Image 9

Sweden is pre-filled. If you click on the "arrow”, a drop-down list will appear that allows you to change the country on the trailer (Image 10).
Image 10

Fill in Fordonstyp (Vehicle Combination type) on Trailer 1 (Image 11).
- Lastväxlare (Hook lift truck) - The tractor unit does not have Banke (Bunk), Fast skäppa (Fixed load unit), No Skäppa ID (No load unit ID), or Skäppa ID Ibland (Load unit ID sometimes).
In cases where there is Skäppa ID ibland (Load unit ID sometimes), you need to enter the Skäppa ID (Load unit ID) when there is a measurement flow with Skäppmätning (Fixed loading measurement).
- Banke (Bunks)
- Fast Skäppa (Fixed load unit)
Image 11

If you choose Fast skäppa (Fixed load unit), you have to specify the number of Skäppor (Load units) and what Skäppa ID (Load unit ID), it is on each Skäppa (Load unit). See Image 12.
Image 12

Fill in the maximum weight of Ekipaget (The Vehicle combination), that is the maximum allowed with load (Image 13). It is a voluntary task.
If you fill in Maxvikt (The maximum weight), the maximum weight will be included in Transportuppgifter (The Transport information). You don't have to fill in that field every time. In Transportuppgifter (Transport details), the field is mandatory.
Image 13

When all the required fields are filled in, add your vehicle combination. Click Lägg till (Add). See image 14.
Image 14

A dialog box will appear, with a control question (Image 15). Click Spara (Save) if you want to save your vehicle combination.
Image 15

When you have added your Vehicle combination, you return to the start page Mina ekipage (My Vehicle Combinations).
In Mina ekipage (My Vehicle combinations), you can see if the vehicle combination has Krönta bankar (Crowned bunks), and if there is any Maxvikt (Maximum weight), registered on the vehicle comination (Image 16).
Image 16

If you click on the "underline" (See the green arrow), you will see the Bankbredd (Bank width) and whether the vehicle combination is approved for Tara (Tare). If it is approved for tare and there is Taravikt (Tare weight) and Medeltara (Medium tare), that information is on that page (Image 17).
Image 17

To go back to the start page, and be able to start a delivery session, click Bakåt (Back). See image 18.
Image 18

Remove Vehicle combinations from Mina ekipage (My Vehicle Combinations)
To remove a Vehicle combination from Mina ekipage (My Vehicle Combinations), click on Administrera mina ekipage (Manage My Combinations).
Image 1

In Mina ekipage (My Vehicle combinations), you can find which vehicle combination you want to remove. Click on Ta bort koppling (Remove connection), and the vehicle combination will disappear (Images 2 and 3).
The vehicle combination will remain in the Mätplatsstödet (Measurement Site Support) and Chaufförsklienten (The Driver Client). You can add the vehicle combination at any time again.
Image 2

Image 3

Check an Ekipage (Vehicle combination), which Taravikt (Tare weight) and inlagd bankbredd (Bunk width)
Image 1

Under Mina ekipage (My Vehicle combinations), click on Aktuellt ekipage (Current Vehicle combination). See Image 2.
Image 2

When you have clicked on the vehicle combination you will see a view that you can scroll in (Images 3, 4, and 5). In this view, you can see Bankbredd (Bunk width) and Kranvikt (Crane weight), which are registered by Mätaren (The Measurer).
You can see how your Vehicle combination is set up, whether the vehicle combination can run on Fast tara (Solid tare), or Medeltara (Medium tare).
In image 4, Medeltaran (Medium tare) is Ja (Yes).
If there is a measurement service, this vehicle combination is ready to run on medium tare.
The measurer sets the setting of Medeltara (Medium tare) and Fast Tara (Solid tare).
Image 3

Image 4

Image 5

As a driver, you can change the maximum weight.
Click in Maxvikt (Maximum Weight). The box Spara (Save) becomes available (Image 6).
Change the weight and Spara (Save). The weight you have saved will be pre-filled when you submit transport information in Chaufförsklienten (The Driver Client)
Click on Bakåt (Back) to get back to Mina ekipage (My Vehicle combination).
Image 6

If you have changed the maximum weight and clicked Bakåt (Back), without saving, a dialog box will appear (Image 7).
If you click Avbryt (Cancel), you will stay at the page of the information about your Vehicle combination.
If you click Spara inte (Do not save), you will return to Mina ekipage (My vehicle Combinations).
Image 7

If Befraktaren (The Original Logistics Buyer Agent) has Ekipagekontroll (Vehicle combination control) Ja (Yes) in Aktörsregistret (The Entity register) in Affärssystemet (The Business system), the maximum weights in the Chaufförsklienten (The Driver Client) and Mätplatsstödet (Measurement Site System) may differ from what is stated in the vehicle combination register in the Business system. In these cases, it is always the maximum weight in the system that applies when calculating value.
If Befraktaren (The Original Logistics Buyer Agent) has Ekipagekontroll (Vehicle combination control) Nej (No) in the Operator register, in the Business system, it is the maximum weight (Maxvikt), that you enter in the Transport information in Chaufförsklienten (The Driver Client), that will be sent to the system (Image 8). If you change the maximum weight here on the transport information (Image 8), the maximum weight in Chaufförsklientens (The Driver Client) vehicle register will not be changed.
Image 8

The information entered in Chaufförsklienten and Mätplatsstödets vehicle combination register (The Driver Client's and Measurement Site Systems vehicle combination register), is the information that is pre-filled in the transport information in Chaufförsklienten (The Driver Client). See image 8.
The maximum weight in the vehicle combination register, in the Business system will be updated continuously after each delivery with the maximum weight you stated in the transport information (Image 8).
If you notify delivery from an external transport system, the maximum weight specified in the external system will be sent with the transport information to the vehicle combination register in the business system.
The maximum weight in the Vehicle combination register in the business system, will be updated continuously after each delivery.
The maximum weight in Chaufförsklienten (The Driver Client) or Mätplatsstödet (Measurement Site System) will not be updated with the maximum weight sent from the external system.
Changing the Fixed Load unit ID on an existing vehicle combination
When you notify delivery in Chaufförsklienten (The Driver Client), you will receive the pre-selected Measurement unit on the tractor unit and trailer. If the information is not correct, you can change it in settings.
Select Administrera mina ekipage (Administer my combinations). See image 1.
Image 1

Select Registrera nytt ekipage (Register a new Vehicle combination). See image 2.
Image 2

Fill in the full registration number of the tractor unit. When the full registration number is filled in, information in the black circle fields will appear automatically (Image 3).
Image 3

Change the Skäppa ID 1 (Fixed load unit ID 1), which you have on the tractor unit (Image 4).
Image 4

Write in your Maxvikt (Maximum weight) on the vehicle combination and click Lägg till (Add). See image 5.
Image 5

A dialogue box will appear. Click Spara (Save) and you will be returned to the page Mina Ekipage (My Vehicle combinations). See image 6.
Image 6

Ändra Alltid kran, Aldrig kran, Kran ibland (Always crane, Never crane, Sometimes crane)
This is the place, you set up crane preferences for the Leveransavisering (Delivery notification) in Chaufförsklienten (The Driver Client).
Click on Administrera mina ekipage (Manage my combinations). See Image 1.
Image 1

Click on Registrera nytt ekipage (Register new vehicle combination). See Image 2.
Image 2

Fill in the full registration number of the tractor unit (Image 3).
Image 3

When you have entered your registration number on the tractor, information will appear about what the tractor unit looks like (Image 4). In Kran (Crane) there is a drop-down list, where you can choose the setting:
- Alltid (Always) - An attached crane on the tractor unit.
- Ibland (Sometimes) - Detachable crane.
- Aldrig (Never) - There is no crane on the tractor unit.
Image 4

The setting you have, affects when you should Fördela last (Allocate load) at Nytt leveranstillfälle (New Delivery opportunity).
If it is set to Ibland (Sometimes), you can always choose Ja och Nej (Yes and No). See Image 5.
Image 5

If it is set to Alltid (Always), it will be pre-filled Ja (Yes), and it will not be possible to change it in the Fördela last (Allocate loads) view. See image 6.
Image 6

If it is set to Aldrig (Never), it will be pre-filled Nej (No) and it will not be possible to change it in the Fördela last (Allocate loads) view. See image 7.
Image 7

It is important that you have the right settings, so that it is right when measuring raw material, tare weights, average tare and the value calculation of the transport.
Fill in the Maxvikt (Maximum weight), and click Lägg till (Add). See image 8.
Image 8

A dialog box will appear. Click Spara (Save) (Image 9), and you will return to the page Mina ekipage (My Vehicle combination).
Image 9

Changing country on tractor unit and trailer
If you change the country on an existing tractor unit or trailer, this vehicle combination will become a completely new vehicle combination. This is how you change the country on an existing vehicle combination:
Click on Administrera mina ekipage (Manage my combinations). See Image 1.
Image 1

Click on Registrera nytt ekipage (Register new Vehicle combination). See Image 2.
Image 2

Fill in the full registration number of the Dragbil (Tractor unit). See Image 3.
Image 3

Change the country in the drop-down list (Dragbil, landskod). See Image 4.
Image 4

Once you have changed country, you need to fill in the Kran (crane) and Fordonstyp (Vehicle type) (Image 5). The maximum weight is voluntary. If you fill in the maximum weight, it will be pre-filled on the Transport information in Chaufförsklienten/the Driver Client. You do not need to fill in the maximum information on each delivery opportunity.
Click Lägg till (Add), when you have filled in the information.
Image 5

A dialog box will appear. Click Spara (Save), (Image 6) and you will be returned to Mina ekipage (the Vehicle combination).
Image 6

In the Vehicle combination there will be two identical registration numbers with different countries (Image 7).
If you use the same registration number and there are different countries, there will be two different Vehicle combinations in the Business system.
Image 7

Ändra Banke, Fast Skäppa, Lastväxlare (Change Bunk, Fixed Load unit, Hook lift truck)
If you change the vehicle type on the tractor unit, or trailer, there will be no new vehicle combination or vehicle in the Chaufförsklienten (The Driver Client).
If you change the country on an existing tractor unit or trailer, this vehicle combination will become a completely new vehicle combination.
This is how you change the country on an existing vehicle:
Click on Administrera mina ekipage (Manage my combinations). See image 1.
Image 1

Click on Registrera nytt ekipage (Register new vehicle combination) (Image 2).
Image 2

Fill in the full registration number of the tractor unit (Image 3).
Image 3

Lastväxlare (Hook lift trucks) should be used if you have no Skäppa ID (Load unit ID), No Banke (Bunk) and Skäppa (Load unit), on the tractor unit or trailer.
If you have a Skäppa ID (Load unit ID), but it is not a Fast skäppa (Fixed Load unit), you should use Lastväxlare (Hook lift trucks).
Image 4

If you choose Fast skäppa (Fixed Load unit), you need to fill in Skäppa ID (The Load unit ID). See Image 5.
Image 5

If you have selected, hook lift trucks on tractor unit and trailers, the Vehicle combination in the Leveransavisering (Delivery notification mode), will look like image 6, in Chaufförsklienten (The Driver client).
Image 6

When you have selected the vehicle type and filled in the Measurement unit ID where the choice was Fast skäppa (Fixed Load unit), click Lägg till (Add).
A dialog box will appear. Click Spara (Save). See Image 7.
You will then be returned to the page Mina ekipage (My Vehicle combinations).
Image 7

Notify in Chaufförsklienten (The Driver Client)
When a driver loads the Vehicle combination, to carry out a transport, you need to notify a new Leveranstillfälle (delivery opportunity) in Chaufförsklienten/the Driver Client.
The recommendation is to make the notification in connection with loading if possible.
With notification, a Leveransavisering (delivery opportunity) is sent with information about the delivery to the receiving industry. (This is to be able to efficiently manage forklifts and warehouses in industry, to actors who manage road bearings and adjust the road layer after loading, and to those who build services around the Notification situation.)
For example, to be able to show how many Vehicle combinations that are estimated to an industry at a certain time. It also informs the surveying staff that a delivery is on its way and they can prepare for measurement.
Create a new delivery opportunity
You have saved your vehicle combination under Mina ekipage (My Vehicle combinations), and you log in to Chaufförsklienten (The Driver Client) to create a new delivery opportunity.
You choose the vehicle combination that you use today (Image 1).
Image 1

Select Skapa nytt leveranstillfälle (Create new delivery opportunity). See image 2.
Image 2

Distribute load bank
The selected vehicle combination is shown in the image. See image 1.
Image 1

By marking plus or minus per load carrier, it is possible to increase or decrease the number of available loading spaces on each hook lift track (Lastbärare). See image 2.
Image 2

Select Ja (Yes) or Nej (No) under Kran (Crane). See image 3.
See chapter Ändra Alltid kran, Aldrig kran, Kran ibland (Always crane, Never crane, Sometimes crane) for instructions on how to change settings on Kran (Crane).
Image 3

Fördela last skäppa (Distributing the Load Unit)
The selected vehicle combination is shown in the image below.
Image 1

When registering a new vehicle combination, you stated that there was a Lastplats/Skäppa (Loading space/Load unit) on the vehicle combination and a Lastplats/Skäppa (Loading space/Load unit) on the trailer. Then you can only remove loading spaces on the minus sign (Image 2).
Image 2

The posted Skäppa ID (Load unit ID) that has been provided when registering the tractor unit, and trailer is shown in the image (Image 3).
Image 3

You can change the Skäppa ID (Load unit ID), to a new Skäppa ID (Load unit ID), in this view by typing in the field Skäppa ID (Load unit ID). See image 4.
Keep in mind that the measurement unit must be crowned if you drive to a measurement site that requires this.
Image 4

If Kran (Crane) is pre-filled Nej (No), it can’t be changed (Image 5). See Chapter Ändra Alltid kran, Aldrig kran, Kran ibland (Always crane, Never crane, Sometimes crane) , to learn how to change settings on Kran (crane).
Image 5

Cancel Delivery Opportunity
You may need to Avbryta leveranstillfälle (Cancel A Delivery Opportunity) in Chaufförsklienten (The Driver Client) if, for example, you discover that you have entered incorrect information. You can cancel any measurement service you are authorized to perform.
You can’t cancel if:
- All or parts of the raw material have been unloaded (this also applies to kontrolltravar (control piles), stickprov (samples) etc.).
- The delivery opportunity is marked as completed in Chaufförsklienten (The Driver Client).
If you cancel a delivery opportunity, it will be deleted from Chaufförsklienten (The Driver Client). You will then need to redo the delivery notification with the correct information.

Samlast (Joint load) - Distribute deliveries for Skäppa och Banke (Load unit and bunk)
If it is a delivery on the vehicle combination, it is one colour and the same letter on all Lastplatser (Loading spaces). See image 1.
Image 1

For three deliveries divided into three Lastplatser (Loading spaces), you don't need to do anything with A1 (Image 2). There is no sharing in this Loading space in this example.
Image 2

On the second delivery, which is located at Loading space A2, you need to click on A2 once (Image 3).
Image 3

The Loading space changes colour and letter B1 (Image 4). This means a new delivery at that Loading space.
Image 4

Click on A2 (Image 5), with two clicks so that it says "C1" on that Loading space (Image 6).
Image 5

Image 6 now shows three deliveries at three Loading space.
Image 6

If you click on C1 again, the loading space, will turn grey with a line in it, which means that there is a load at the loading space, but it should not be measured (Image 7).
Image 7

If you click on the cross (See the red arrow in image 8), you remove the loading space (Image 9).
Image 8

Image 9

If you click on the plus sign (Image 10) on the removed loading space, you will return to the original position (Image 11).
Image 10

Image 11

A Lastplats (Loading space) can be divided vertically by clicking on Dela trave (Divide stack) button. See images 12 and 13.
Image 12

In image 13 you can see four deliveries and the last loading space has a division (C1 and D1) at the loading space.
Image 13

If there was an error, creating a shared loading space, you can click on the "cross" in the top corner (Image 14).
Image 14

When you are done with Fördela last (Distributing loads), click Nästa (Next). See image 15.
Image 15

Enter Delivery details and Transport Norway
In the edging you can see the equivalent of the colour of the deliveries loaded onto the Vehicle Combination (Image 1).
Image 1

Enter the Avtalsobjektsnummer (Object of agreement number) that is loaded on A1 with eight digits (Image 2).
The Avtalsobjekt (Object of Agreement) is the equivalent of the Virkesorder (Timber order) in Viol 2.
Image 2

Select in the drop-down list under Startplats transport (Starting location transport) which drop-of or storage site you loaded.
If there is only one drop-of or one storage site, there is only one choice (Image 3).
Image 3

From the drop-down list under Handelssortiment (Trade assortment), Select the assortment you have loaded (Image 4).
Image 4

In the drop-down list under Mottagningsplats (Receiving location), select which receiving location the raw material is going to (Image 5).
Image 5

At Mottagningsplatsen (Receiving location), there can be several Mottagare (EndUsers). In the drop-down list under Mottagare you click Mottagare (EndUsers).
In this example, when we selected the receiving location, the fields Mottagare (EndUser) and Mätplats (Measurement site) were filled in. That's because there was only one EndUser and one Measurement site to choose from (Image 6).
Image 6

On delivery B, you have two possible measuring sites to measure the raw material (Image 7).
Image 7

Select Måttslag (Measurement standard) in which the raw material will be measured and estimate how much quantity you have loaded (Image 8).
Image 8

If the wood is marked, it must be filled in under Virkesmärkning (Wood marking). See image 9. This is a voluntary task.
Image 9

In the drop-down list under Slutkört (Completed), you can inform what is left of the Handelssortimentet (Trade assortment), at the drop-of or storage site after you have loaded (Image 10).
Image 10

Transport Norway
If you have a Fraktbrev (Shipping document) from the VSYS system in Norway, the shipping document must be filled in the field under Leveransinnehåll (Delivery content). See image 1.
Image 1

The Måleuppdragsnummer (Measuring order number) must be filled in under the field Mätorder (Measurement order). See image 2.
Image 2

The Entity that issued the Måleuppdragsnummer (Measuring order number), can you select in the drop-down list under Mätorder utförare (Measurement order executor). See image 3.
Image 3

Performer and arrival
In the drop-down list under Utförande transportföretag (The Carrier), select the Åkeri (Haulage company) that carries out the transport. It is important that you choose the right one so that the value calculation and follow-up, to the haulage company that you are driving for, is correct.
At Transportenhet (Transport unit) you can enter a unit of three digits if it is entered in the Aktörsregistret (Entity register) of the Utförande transportföretag (The Carrier) that you are driving for.
Image 1

In Ankomst mätplats (Arrival of the measurement site), you must state the day and time that you are expected to arrive at Mätplats (The Measurement site).
The date and time must always be stated in Swedish time, even if you are in another country.
In this example, we are going to three different measurement sites (Image 2).
Image 2

By clicking on Kalender (Calendar), you can set the time when you arrive at Mätplats (The Measurement site). See image 3.
Image 3

When you are about to drop off at Mätplats (The Measurement site), the work steps will be listed in time order. The work steps are shown in the order that you have notified to different measurement sites (Image 4).
Image 4

Enter the time when you expect to arrive at Mottagningsplats (The Receiving location). See image 5.
Image 5

Click Avisera (Notification). See image 6.
Image 6

A Delivery Opportunity (Joint load) can consist of several deliveries
Leveranstillfälle (A delivery opportunity) can consist of several deliveries. Leveranstillfälle ID (A unique delivery opportunity ID) is created at the Measurement site you are measuring at.
In this example (Image 1), there are three different delivery opportunities.
A Leverans ID (Delivery ID), and a Leveranstillfälle ID (delivery opportunity ID), of A1.
B1 also gets a unique Delivery ID and another unique Delivery time ID. C1 also gets a unique delivery ID and delivery opportunity ID and this is because there are three different Measurement sites.
In VIOL 3, you cannot connect three deliveries A1, B1 and C1 to one delivery opportunity, that provides information that these three deliveries were loaded on one and the same combination as a Samlast (Joint load) when the deliveries are going to three different measurement sites.
Image 1

In this example (Image 2), there are three deliveries that are going to the same measurement site. There are three different Avtalsobjekt (Objects of agreement). Delivery A, B and C and each delivery will have a unique Leveranstillfälle ID (Delivery opportunity ID). There are three different Delivery IDs, but one Delivery opportunity ID, that keeps the deliveries together to the same Mätplats (Measurement site).
Image 2

Load filling and multiple measurement sites
In Transportuppgifter (The transport details) you must mark Fullt lass (Full load), if you have compensation for Garantilass (Cargo filling/Warranty load).
In the case where you are going to several measurement sites, we recommend that you contact Ansvarigt transportföretag or Befraktare (Responsible Transport Company/The Original Logistics Buyer Agent) to handle this.
We recommend that you fill in Fullt lass Nej (Full load No) and handle this separately on Transportsedel (The Consignment note), when the vehicle is loaded with deliveries from different measurement sites.

Arrival at the Measurement site also applies to Leveransavisering (Delivery notification) from a Transport management system
If you are making Leveransavisering (A Delivery notification) from an external transport management system, this is the view you will come to. See image 1 below. You need to add your vehicle combination to Mina ekipage (My combinations) for the vehicle combination to appear as selectable, under Ekipage (Vehicle Combination). See Chapter Ta bort ekipage från Mina ekipage).
Before reporting your arrival Ankomst mätplats (Arrival measurement site) at a Measurement site
Be sure to check that it is the right Ekipage (Vehicle combination). Otherwise, switch to the right vehicle combination (Image 1).
Image 1

Click on the Small triangle and the head of the current delivery will open/close. If the information in the black box is correct, you can choose to Anmäl ankomst till mätplats (Report arrival at the measurement site).
The orange text Vänta på åtgärd (Wait for action), means that you must complete this step (Image 2).
Image 2

Verify that the icon matches the Vehicle combination that you are going to measure. In this case the Vehicle combination has Kran (a crane), when measuring. See the framed Vehicle combination, image 3.
Verify the information in Leveransaviserad (the Delivery notification). If all the information is correct, you can click Anmäl ankomst (Arrival report). See image 3.
If the information is not correct, click Avbryt avisering (Cancel notification). See Image 4.
Image 3

If the image does not match what the vehicle combination looks like (Image 3), you need to change the settings on Kran (Crane), by Administrera mina ekipage (Administer my combinations), before you notify Leveransavisering (The Delivery notification).
If you report from a different external Transport management system than Chaufförsklienten (The Driver Client), you need to change the settings in the system from which you are making the delivery notification.
Image 4

Komplettera leveransuppgifter (Completing Delivery details)
When you have pressed the key Anmäl ankomst till mätplats (Report arrival at the Measurement site):
The view with delivery notification information will appear, and instead of Anmäl ankomst (The Arrival report) button, it says Nästa (Next). Once you have pressed Nästa (Next), you will see to Komplettera leveransuppgifter (Complete delivery details view). See images 1 and 2.
If you need to complete more information, for instance, this can be Mätande företag (Measuring Party), whether it is Stockmätning (Log/timber measurement) or Travmätning (Stack measurement of pulpwood).
Image 1

Image 2

If it is the same Mätplats (Measurement site) and the same Mätningstjänst (Measurement service) and several Mätande företag (Surveying companies), this choice will appear in Chaufförsklienten (The Driver Client).
If you are going to supplement with a Surveying company, you need to contact your transport Manager or The Original Logistics Buyer Agent to find out which surveying company you need to declare.
Transportuppgifter (Transport details), and Transportunderlaget (The Transport documentation) need to be user-created if you are to see it in the Business system.
In the Business system, you can see this under Valt transportunderlag (Selected transport documentation), under Mätmetod (The Measurement method). See Image 3.
Image 3

You may have to choose a surveying company for several measurement services. The specified Angiven bruttokvantitet (Declared gross quantity), is one example of a measurement service. Stockmätning (Log/timber Measurement) is another measurement service (Image 4).
Image 4

When Mätmetod (Measurement method) appears, you need to specify which measurement method, Travmätning (Stack measurement) or Stockmätning (Log/timber measurement). See image 5.
Image 5

In Transportinstruktionen (The Transport instructions), you can see which measurement method applies and whether there are alternative measurement methods.
Under the tab Destinerade sortiment (Destined assortments), the flag is set to Ja (YES) on Stockmätning (Log/timber measurement), then it is only possible to measure Log/timber measurement.
If Travmätning (Stack measurement of pulpwood) is included as a measurement service, it is not possible to measure Stack measurement of pulpwood. You cannot select the measurement method in Chaufförsklienten (The Driver client). See image 6.
Image 6

Under Mätmetoder (Measurement methods), you can see measurement services available (Image 7).
Image 7

If the flag is set to Nej (No), on Stockmätning (Log/timber measurement), and there is nothing filled in under Preliminär mätmetod (the Preliminary measurement method) (Image 8), you need to look at the measurement services to determine if there is only Travmätning (Stack measurement of pulpwood) or if there is primary Stockmätning (Log/timber measurement) and secondary Travmätning (Stack measurement of pulpwood). See image 9.
Image 8

Image 9

If there is primary Stockmätning (Log/timber measurement), the timber should be measured as logs by the measurement service. When a Measurer, Transport coordinator, or The Original Logistics Buyer Agent contacts you and states that the timber should be measured as stacks, you can then change the measurement method.
When there is primary Stockmätning (Log/timber measurement) and secondary Travmätning (Stuck measurement of pulpwood), you will see a selection option in Chaufförsklienten (The Driver Client).
If Primär mätmetod (Primary measurement method) is filled in with Stockmätning (Log/timber measurement) (Image 10) and under the tab Mätmetod (Measurement method) there is only the measurement service Travmätning (Stack measurement of pulpwood), and you should contact the Transport Manager or the Original Logistics Buyer Agent to check if it is correct.
What is written under Prioriterad mätmetod (Priority measurement method), does not control which measurement services are found in the destination. Therefore, you should check which measurement services are available when it is Stockmätning Nej (Log measurement No).
In Prioriterad mätmetod (Priority measurement method), you can find information as a driver. When there is Travmätning (Stack measurement of pulpwood) and Stockmätning (Log/timber measurement) as a choice in Chaufförsklienten (The Driver Client), you should easily know which measurement method to choose in the first place.
Image 10

Weighing before the incoming inspection
In some cases, you will be allowed to perform weighing. When this is relevant, the scale icon is blue or orange.
The scale icon is shown halfway to show that it is the first weighing you are going to perform. In this case, it is a fold-in with a load before Mottagningskontrollen (The Incoming inspection). See image 1.
Click on the line with the half-wave icon (Image 1).
Image 1

When the vehicle combination is on the scale and the vehicle combination is ready to be weighed, you should choose which scale you are standing on if there are several scales. You do this through the drop-down bar under Våg (Scales). If there is a scale, there is only one scale to choose (Image 2).
Image 2

When you have selected the scale, select Läs in vikt (Load weight) and click Spara (Save). See image 3.
Image 3

When you have retrieved the weight, the Icon and colour will still be blue on Våg (The scale), until Mottagningskontrollen (The Incoming inspection) is done (Image 4).
Image 4

When Mottagningskontrollen (The Incoming inspection) is done, half of the scale is green. This means that the first weighing is completed and there is still one weighing left (Image 5).
Image 5

When you have completed Bruttovikt (The Declared Gross weight), you will be taken to Vägning (The weighing view). See image 6. It is Vägning vid avgång (Weighing at departure). In this case, it is Travmätning (Stack measurement of pulpwood), that the Measurer should do first, and you should unload the load before you read in weight.
You must select Våg (Scale), and Läsa in vikt (Load weight) when the Vehicle combination is on the selected scale.
Image 6

Then click Slutför (Finish). See image 7.
Image 7

A dialog box will appear and if you want to complete the weighing. Click Slutför (Finish). See image 8.
Image 8

Weighing on a short scale. The car and the trailer separately
When you come to a short scale where the entire Vehicle combination cannot be weighed in, and needs to be divided into two weighings. One for Dragbilen (The tractor unit) and one weigh for Släpet (The trailer), which becomes a total weight of the Vehicle combination of two partial weighings.
In Vägningstjänsten (The weighing service), you need to Aktivera delvägning (Activate partial weighing). See image 1.
Image 1

When you have activated partial weighing, a field will appear Vikt delvägning ton (Weight part weighing ton). When you have retrieved the weight of Dragbilen (The tractor unit), the car's weight is shown under Vikt delvägning ton (Weight partial weighing tons).
Click Lägg till delvägning (Add Partial Weighing) to save the weight of the car (Image 2).
Image 2

In the circled black box you can see part weighing 1 which is 31 tons. Drive forward to weigh the trailer. When the trailer is on the scale, you can retrieve the weight of the trailer by pressing Läs in vikt (Load weight). See image 3.
Image 3

The trailer's weight 38, is shown in the box Vikt delvägning ton (Weight partial weighing tons), and click Lägg till delvägning (Add part weighing). See image 4.
Image 4

After you add weigh two, the first weight cannot be removed. The button Spara (Save) becomes selectable at the bottom to save both weights (Image 5).
Image 5

When you click Spara (Save) a dialog box will appear; Vill du spara vägning? (Would you like to to save weighing).
If you click on Spara (Save), you will be taken further in the feed (Image 6).
Image 6

When Vägning vid avgång (Weighing on departure), you need to Aktivera delvägning (Activate partial weighing) again (Image 7).
Image 7

When partial measurement is activated and you are standing on the scale with the tractor, click Läs in vikt (Load weight), and save the weight of the tractor by clicking on Lägg till delvägning (Add partial weighing). The tractor's partial weighing of 16 tonnes can be seen in the image (Image 8).
Image 8

Drive forward so that the trailer is on the scale, then you can click Läs in vikt (Load weight), and save the weight of the trailer by clicking on Lägg till delvägning (Add partial weighing). The trailer's partial weighing 15 tons and both partial weighings can be seen in image 9.
Image 9

If you open the Vägning vid ankomst (Weighing on arrival) view on the arrow, you can see the total weight under Vikt vid ankomst, ton (Weight on arrival, tons), and Taravikt (The tare weight) of the vehicle combination under Vikt vid avgång, ton (weight on departure, tons), and the weight of the raw material under Bruttovikt, ton (Gross weight, tons). Click Slutför (Finish) to exit the weighing service Image 10.
Image 10

By clicking Slutför (Finish), a dialog box will appear if you want to complete the weighing (Image 11).
Image 11

If something went wrong when you weighed the trailer, you can click on Ta bort (Remove), and the weight of the trailer will disappear and you will have to make a new weighing on the trailer (Image 12).
Image 12

Once you have removed the weight of the trailer, you will have the opportunity to remove the weight of the tractor as well. You can start over by doing a new Vägning vid avgång (Weighing at departure), on the tractor unit and trailer (Image 13).
Image 13

You can only remove weights on Vägning vid ankomst (Weighing on arrival), and Vägning vid avgång (Weighing on departure), as long as you have not clicked Slutför (Finish).
Weighing Samlast (Joint load) of several deliveries at the same Measuring site
If you have several deliveries on your vehicle, you will need to distribute the weight between the different deliveries.
You have weighed in the entire vehicle combination, which has three deliveries. Delivery A, Delivery B and Delivery C. The arrival weight was 70 tons for the entire vehicle combination (Image 1).
Image 1

On each delivery, you must state the weight of the raw material. You are free to state it as a percentage, shares or tons. You must use the same variety on all three deliveries.
Example: If you want to enter as a percentage, then you estimate how many percent deliveries A, B and C have. If all stacks weigh the same amount on shipments A, B and C, you add 33.33% on shipments A, B and 33.34% on shipments C. Then the sum of the three shipments will be 100%. You do not need to enter % in decimal places. You can state in whole percentages (Image 2).
Image 2

Once you have entered the percentage, click Spara (Save). See image 3.
Image 3

When you pick up the departure weight, you can see how the weight distribution per ton and shipment A, B and C will be. Click Slutför (Finish). See image 4.
Image 4

Driver-approved Incoming inspection
To make Chaufförsgodkänd mottagningskontroll (A Driver-approved Incoming inspection), and image measurement, you need to have completed the training and obtained the qualification as a driver.
The icon looks like an eye and the bar is orange to indicate that you are allowed to perform Mottagningskontroll (An incoming inspection). Click on the row with the camera icon to get to Bildmätning (image measurement). See image 1.
Image 1

In the image measurement view, select Kamerarigg (The camera rig) if there are several rigs at the measurement site. The views can look different depending on the rig (Images 2 and 3).
Image 2

Image 3

If you want to send the images to the measurer, click Ja (Yes). If you want to approve the images yourself, click Nej (No). You can change your mind when the images are taken before you send them.
Once you click Nej (No), Starta mätning (Start Measurement) and Torka kameror (Wipe Cameras) will be accessible (Image 4).
In image 4, Dragbil (the tractor unit) has a crane. It is important that it matches what the tractor unit looked like at the time of measurement, and what you have written in the Leveransavisering (Delivery notification). Kran eller inte kran (Crane or not crane) can affect whether you run on tare weight and medium tare. Or the price bill if there is one in the price list.
If you do not have a crane on the tractor unit at the time of measurement, you must cancel the delivery and repeat Leveranstillfälle (Delivery opportunity) without a crane on Dragbilen (The tractor unit).
Image 4

Click Starta mätning (Start Measurement), to start the image capture.
The images will come up on your screen and Mottagningskontrollen (The incoming inspection). See images 5 and 6.
Image 5

Image 6

If you stated Virkesmärkning (The wood marking) in Leveransavisering (The Delivery notification), that information will be carried to Mottagningskontroll (The incoming inspection). If you leave the delivery notification blank, you need to fill in Virkesmärkning (The wood marking). If there is no wood labelling, you need to write a number (Image 7).
Image 7

Look through the images:
- That the entire stack is visible in the side image.
- That the entire end surface of the stack is visible in the gable pictures.
- That the images have good enough sharpness and light.
Be extra careful in the sun, fogging and lack of lighting that can affect the quality of the images. - That rollover patches or stamps are visible and legible.
- That the number of splits and markings at the aggregate in a stack is correctly executed.
Do you assess that the images are approved, and the wood labelling matches the images. That you have announced the correct setting on the Vehicle combination in this case with Kran (a crane), as you see in the image, and the Delivery is deliverable. If you click Ja (Yes), and Slutför (Finish), the images will be sent to the Measurer for measurement.
A dialog box will appear (Image 8). Click Slutför (Finish).
Image 8

If the delivery is not deliverable, you must fill in the reason for Mätningsvägran (the Measurement refusal), and the estimated volume that is refused. The reasons will come up after you click Nej (No). See image 9.
Image 9

If the pictures are not good, you can take new pictures by clicking Start new measurement. You can also wipe cameras by clicking on Wipe cameras before taking new photos (Image 10).
Image 10

The Measurer must approve the images
If you have clicked Ja (Yes) in the box Skicka bilder till mätare (Send pictures to the Measurer), Mottagningskontrollen (The incoming inspection) will be locked below the images. Look through the images to make sure that they look good and click Slutför (Finish). Wait for the Incoming inspection to be approved by a Fjärrmätare (Remote Measurer). See image 1.
Image 1

If everything is fine with the images and the Measurer approves the images, Mottagningskontroll (The Incoming inspection) will be shown green. There will be no dialogue from the Measurer, that the images are approved (Image 2).
Image 2

If the images are not approved, you will receive a dialog box from the measurer with information.
In the dialog box, the measurer wants you to brush off the snow, so that the stack tags is visible on the stacks. Once that's done, you take new images (Image 3).
Image 3

If there are several camera rigs, you will have to choose the camera rig again to retake the images (Image 4).
Image 4

If a stack of three stacks is refused, you will get a dialog box. The dialog box says which stack is refused. The vehicle combination, A3 has turned grey, and then you can see a round symbol (Image 5).
Image 5

If the Measurer has interrupted the delivery in Mottagningskontrollen (The incoming inspection), you will get a dialog box (Image 6).
It is important that you cancel Leveranstillfället (The Delivery opportunity) that you have notified of delivery in a Transportledningssystem (Transport management system).
Contact the Measurer for information if you need to make the Delivery notification one more time.
Image 6

If your vehicle combination does not have crowned banks and there is no measurer in place or there are some measurement services that you have to carry out yourself. A dialog box will appear when you click on Anmäl ankomst (Report arrival). See image 7.
Image 7

Click on Anmäl ankomst (Report arrival), and you get this error message: Ett fel uppstod. Then you already have a drop-off in progress at that Measurement site (Image 8).
You need to finish the ongoing drop-off before you can arrive with a new Leveransavisering (Delivery notification). The Driver who has started the drop-off can only finish the drop-off.
Image 8

To get to the ongoing drop-off, click Bakåt (Backwards), (Image 9) and you will be taken to the overview view where you see your drop-off.
Image 9

Driver-approved Angiven Bruttokvantitet (Declared Gross Quantity)
On the start page, you'll see the Angiven bruttovikt (Declared gross weight) waiting for action (Image 1).
Image 1

When you are in Mottagningskontrollen (The Incoming inspection) view and clicked Slutför (Finish) in the Incoming inspection, you will be taken to Angiven Bruttokvantitet (The Declared Gross quantity view). See image 2.
You won't be able to access the home page (Image 1).
The estimated volume that you entered in Leveransaviseringen (Th,e Delivery notification) is pre-filled. You can change the quantity and if you are satisfied with the quantity that is pre-filled, you can click Slutför (Finish).
Image 2

When you have clicked Slutför (Finish), a control question will appear (Image 3). Click Slutför (Finish) again to end Angiven Bruttokvantitet (The Declared Gross quantity).
Image 3

Image measurement, Stack measurement of pulpwood and Load volume measurement by a Measurer
If there is Travmätning (Stack measurement of pulpwood) or Skäppmätning (Load volume measurement) that a Measurer is performing, you can read Låst, Väntar på mätare (Closed and waiting for a Measurer). See image 1.
If there is a measurer in place, you need to go to Mätbryggan (The Measuring bridge).
Image 1

If it is a Bildmätning (Image measurement), a camera icon will appear and it says Bildtagning (Image capture). You can see the colour orange and Väntar på åtgärd (Waiting for action). See image 2.
Image 2

When you click on Väntar på åtgärd (Waiting for Action), you can then see Bildtagning (Image Capture). You choose a camera rig if there are several camera rigs. Depending on the camera setup, the view looks different in Chaufförsklienten (The Driver Client). See images 3 and 4.
Image 3

Image 4

In image 4, Dragbil (the tractor unit) has a Kran (Crane). It is important that it corresponds to what Dragbilen (The tractor unit) looks like at the time of measurement and what you have Leveransaviserat (The Delivery notified). Kran eller inte kran (Crane or not crane) can affect Taravikt (Tare weight) or Prisräkning (Price bill).
If you do not have a crane on the tractor unit at the time of measurement, you must cancel Leveranstillfället (Delivery opportunity), and make a Leveransavisering (Delivery notification) without a Kran (crane) on the tractor unit.
If the Vehicle combination is correct, and you have a crane on the tractor unit, you can click on Starta mätning (Start measurement). The images will appear on your screen (Image 5). The images are from a test environment.
Image 5

Look through the pictures:
- That the entire stack is visible in the side image.
- That the entire end surface of the stack is visible in the gable images.
- That the images have good enough sharpness and light.
Be extra careful in the sun, fogging and lack of lighting that can affect the quality of the images. - That rollover notes or stamps are visible and legible.
- That the number of splits and markings at the gathering in a stack, is correctly executed.
If you are satisfied with the images, send the images to the Measurer by clicking Slutför (Finish).
If everything is fine with the images and the Measurer approves the images, Mottagningskontrollen (The Incoming inspection) will be marked in green. There will be no dialogue box from the Measurer that the images are approved (Image 6).
Image 6

If the images are Inte godkända (Not approved), you will receive a dialog box from the Measurer with information.
In the dialog box in this example, the Measurer wants you to brush off the snow, so that the roller flap is visible on the trot. Once that's done, take new images (Image 7).
Image 7

If there are several camera rigs, you will have to choose the camera rig again to retake the images (Image 8).
Image 8

If a stack of three stacks is refused by the Measurer, you will get a dialog box, Ej leveransgillt resultat (No deliverable result). The dialogue tells you which stack is Mätningsvägrad (Measurement refusal). On the vehicle combination, A3 has been given a grey colour and you can see a round symbol (Image 9).
Image 9

In the overview, you can see the stack which is not Leveransgill (Deliverable). See image 10.
Image 10

If the Measurer has interrupted Leveranstillfället (The delivery opportunity) in Mottagningskontrollen (The Incoming inspection), you can see a dialog box (Image 11).
It is important that you cancel Leveranstillfället (The delivery opportunity) that you have Leveransaviserat (The delivery notification) in a Transportledningssystem (a Transport management system). Contact the Measurer for information if you need to make the Delivery notification again.
Image 11

If your vehicle combination do not have Krönta bankar (Crowned banks) and there is no Measurer, or there are no measurement services that you can carry out yourself. This dialog box will appear when you click on Anmäl ankomst (Report arrival). See image 12.
Image 12

If you click on Anmäl ankomst (Report arrival), and you get this error message Ett fel uppstod (An error occurred), see image 13. Then you already have a drop-off in progress at that Measurement site. You need to finish the ongoing drop-off before you can arrive with a new Leveransavisering (Delivery notification).
The Driver who has started the drop-off can only finish the drop-off.
Image 13

To get to the ongoing drop-off, click Bakåt (Backwards), you will end up on the overview where you see your drop-off (Image 14).
Image 14

Incoming inspection in Image and Log/timber Measurement (Samlast/Joint load)
If you have Samlast (Joint load) of Stockmätningstimmer (Log/timber measurement timber) and with Travmätning (Stack measurement of pulpwood), in the image, you will see two Mottagningskontroller (Incoming inspections). Both Incoming inspections need to be completed before you can continue your delivery and unload the wood (Image 1).
Image 1

The camera icon that has an eye in the camera is Mottagningskontroll (The Incoming inspection) for the image measurement (Image 2).
Image 2

Mottagningskontroll (Incoming inspection) in the image applies to delivery B1 and you can see it below the images (Image 3). The images are from a test environment.
Image 3

In Mottagningskontroll (The Incoming inspection), the eye is for Stockmätningsvirket (The Log/timber measurement). See image 4.
Image 4

The both Incoming inspections have been completed (Image 5).
Image 5

Printing of Plakat (Posters) and Olika prov (Various samples)
All printouts of posters and samples are done under Utskrift (Printing). See image 1.
No printouts are optional. It is mandatory to do this in connection with random checks or the delivery of timber logs. The colour blue is misleading in these cases, as a help.
Avlämning sågtimmer (Delivery of sawlogs)
If you make a delivery of Stockmätningstimmer (Log/timber measuring timber), you need to go to Utskrift (Print), and print posters that you can put on the delivery.
Image 1

In the print menu, select Avlämningskvitto/plakat (The Delivery receipt/poster) and which delivery it refers to. The arrow shows the same number as the delivery. You can check the number of the printout and delivery B1 when nailing the poster to the unloaded stack that it refers to B1.
Check the box Avstämning sågtimmer B1 (Sawlog drop-off B 1), click Skriv ut (Print). See image 2.
Image 2

You will see a dialog box and you need to Välj skrivare (Select the printer) and Antal utskrifter (The number of copies). When the selections are made, click Skriv ut (Print). See image 3.
Image 3

There will be no dialog box or reminder that you should print out posters when you drop off Sågtimmer (sawlogs).
Sample has fallen out after the reception check
A dialog box will come up, click Till prov (To Sample). See image 4.
Image 4

The image of the car shows which loading space the test have fallen out (Image 5).
What kind of sample, you can see in the circled boxes. You need to certify that you are taking the test and ticking the "boxes" and click Slutför (Finish).
Image 5

A dialog box will appear if you want to complete the sampling. Click Slutför (Finish). See image 6.
Image 6

On the overview menu, you can see that you have completed Stickprov (a sampling check). See image 7.
Image 7

To print out Provlappar (swatches) that will be included with the samples, you need to go to Utskrift (print). See image 8.
Image 8

Under Kvitton (receipts), you can check one Box at a time and click Skriv ut (Print). See image 9.
Image 9

A dialogue box will appear, and you need to select the printer and the number of copies (Image 10).
Image 10

Samples of performed Travmätning (Stack measurement of pulpwood)
The Measurer has made a Stack measurement of pulpwood, and a dialog box appears in Chaufförsklienten (The Driver Client), that there has been a test of the Stack measurement of pulpwood. Talk to the Measurer, and agree which one of you will click on Till prov (To test). See image 11.
Image 11

Once you have clicked Till prov (To test) you will be taken to the Prov har utfallit! (Sample outcome!) A box will appear, which you tick in and certify as a control test. Click Slutför (Finish). See image 12.
Image 12

A dialog box will appear and click Slutför (Finish), to exit the Prov har utfallit! (Sample Outcome), and complete the sample (Image 13).
Image 13

The "K" on the stack means that it is a control stack that must be marked and unloaded at the designated place (Image 14).
Image 14

On the overview you will see that a sample has fallen out and if you click on Utskrift (Print) you will see in the print view which delivery the control stack refers to on the vehicle combination (Images 15 and 16).
Image 15

Print out posters to be nailed to the current control stack when the stack has unloaded. Make sure that the number where the arrow shows is the same as on the printout (Image 16).
Image 16

When printing Välj skrivare (Select the printer) and Antal kopior (Number of copies). See image 17.
Image 17

Delivery opportunity with Transport details
Leveransavisering (Delivery notification) in Chaufförsklienten (The Driver Client)
If you make a Leveransavisering (A Delivery notification) in Chaufförsklienten (The Driver Client), you can provide transport information in Chaufförsklienten (The Driver Client) on deliveries that are part of a delivery opportunity.
If the driver works in a transport system Tass, Street, Prolog, Logdrive, OH or similar, with the ability to send a Leveransavisering (A delivery notification), of a new delivery opportunity is made by sending Leveransavisering (A delivery notification). You do not have the opportunity to enter transport information in Chaufförsklienten (The Driver Client) if you have a delivery notification from a transport system.
Leveransavisering (Delivery notification)
In the event of notification, it is mandatory to indicate Utförande Transportföretag (The Carrier). This is because it is included in the delivery notification to the forklift systems. To specify Utförande transportföretag (The Carrier), you fill in three characters, and then the system suggests Aktörer transportföretag (The Entity Companies). This information is taken to the page where Transportuppgifter (Transport details) must be filled in.
Utförande transportföretag (The Carrier) and Maxvikt (Maximum weight) in transport details
After weighing in and Mottagningskontrollen (The incoming inspection), Transportuppgifter (The Transport details) must be provided. However, it is recommended to wait until after unloading has been completed, as it is only then that the driver can know, for example, how the vehicle combination was unloaded and the distance the cargo was transported.
Transportuppgifter (The transport details) is the information which, together with Inmätt kvantitet (The measured quantity), forms the basis for Transportprisräkningen (The transport cost calculation) in VIOL 3.
When providing Transportuppgifter (The Transport details), all companies in the business chain for transport must be stated.
Utförande transportföretag (The Carrier)
Det utförande transportföretaget (The Carrier) is the company that carries out the transport itself. This, together with the registration number is called Transportörsnummer (The transport number). This was already stated in Leveransuppgifter (The Delivery details), and has been inherited from there to this page. Therefore, it is not necessary to be entered again (Therefore marked in grey). See image 1.
How you can use the transport device
In addition to Utförande transportföretag (The Carrier), it is possible to specify Transportenhet (The Transport Unit). It is an administrative number made for follow-up, which the Åkeriföretaget (Haulage company) may have created in the system. It is primarily for follow-up and can correspond to a car, a vehicle combination, a person, a shift team, or something else that the Åkeriföretaget (Haulage company) itself has decided.
If you have Transportenhet (A transport unit number), it is recommended that it is provided. The field must be filled in with three characters in the form of numbers. If you specified it in Leveransaviseringen (The Delivery notification), this will be included and will be pre-filled and marked in grey (Image 1).
Image 1

Then information about the vehicle combination and the load must be stated.
Maxvikt (Maximum weight) - It is the maximum weight allowed by the vehicle combination that must be entered in this field.
If there is a maximum weight added to the vehicle combination in Chaufförsklienten (The Driver Client), that maximum weight will appear as a suggestion.
You can change the maximum weight here if it is incorrect. If there is no maximum weight added to the vehicle combination in Chaufförsklienten (The Driver Client), you will have to fill in this field for each Leveranstillfälle (Delivery opportunity). This field is mandatory. The specified maximum weight in this field is included with the Transport information to the Business system.
Fullt lass (Full load) - If the driver has a fully loaded vehicle combination, this must be stated in Transportuppgifter (The Transport details). A full load is used to assess whether for example Lastutfyllnad (Load filling) should be paid to the haulage company when the vehicle combination is fully loaded, but the already weighed weight is low. It is important to only choose Fullt lass (Full load) when the load is actually full, as it is possible to check this afterwards. For example, by looking at the dimensions of the different stacks or by requesting to see the images from the image measuring. The full load buttons are shown in orange because it is a mandatory task. When one of these is selected, it lights up in green while the other turns gray (Image 1).
Do you have compensation for Lastutfyllnad (Cargo filling) and are going to several measurement sites, we recommend that you contact Ansvarigt transportföretag/Befraktare (The performing Transport Company/The Original Logistics Buyer Agent) to discuss how to handle this. We recommend that you fill in Fullt lass Nej (Full load No) and handle this on Transportsedel (The Consignment note) separately when a vehicle combination is loaded with deliveries to different measurement sites.
Kran (Crane) - In the part of Fördelning av last (The Distribution of load), it was chosen whether the vehicle combination was carrying a crane or not. This information is inherited to Transportuppgifter (The transport information) page and cannot be changed in this situation (Image 2).
Image 2

Ansvarigt transportföretag (Responsible transport company)
An Ansvarigt transportföretag (A responsible transport company) must be specified. It is Transportföretag (The Transport Company) that has a contract with the The Original Logistics Buyer Agent and has originally received Transportorder (The transport orders) to carry out the transport.
You can easily do this by starting to fill in the first two characters of the main code or the name of Ansvarigt transportföretag (Responsible Transport Company). The system provides suggestions for you to select from in a drop-down list. If Utförande transportföretag (The Carrier) and Ansvarigt transportföretag (The Responsible Transport Company) are the same supplier, this information must be filled in. As a driver, you are expected to know which Aktör (Entity) is Ansvarigt transportföretag (The Responsible Transport Company) when providing Transportuppgifter (Transport information). See image 3.
If Transportföretaget (The Transport Company) is not in the list, Aktören (The Entity) needs to order a Huvudkod (A Master code) from Customer Service. When the Aktör (Entity) is posted, it will appear in the list.
Image 3

Förmedlande transportföretag (Intermediary Transport companies) in Transportuppgifter (Transport details)
A Förmedlande transportföretag (Intermediary transport company) is a Transportföretag (Transport Company) that, for example, has received a Transportorder (Transport order) from Ansvariga transportföretaget (The Responsible Transport Company) to carry out a transport, but has assigned it to another Transport Company.
An example:
Skog AB has a contract with Transport Company A, which in turn has distributed a transport order, or a return to Transport Company B. Transport Company B has all the vehicles out on assignment and therefore forwards the order to Transport Company C. In that case, it is:
- Transport company A – Ansvarigt transportföretag (Responsible Transport Company).
- Transport company B – Förmedlande transportföretag (Intermediary Transport company).
- Transport company C – Utförande transportföretag (The Carrier)
Provided that Transport Company C does not distribute this load as a return to any other haulage company. Then the Transport Company C would also become a Förmedlande företag (Intermediary transport company).
In VIOL 3, it is possible to specify as many Förmedlande transportföretag (Intermediary transport companies) as you like. Chaufförsklienten (The Driver Client) shows Ordningsnummer (The serial number) of the Intermediary transport company in the transport business.
One (1) in Image 4, is the company that has a contract with Ansvarigt transportföretag (The Responsible Transport Company). It is possible to create as many transport business links as you want (Image 4).
Image 4

Lastande företag (Loading companies) in Transportuppgifter (Transport details)
If the loading has been carried out by another Lastande företag (Loading company), it is possible to indicate this in the same way as Ansvarigt och förmedlande transportföretag (The performing and Intermediary Transport Company). Lastande företaget (Loading company) needs Huvudkod (Master code) in Biometria's VIOL system to be entered. Note that no Prisräkning (Price calculation) can be made in VIOL 3 for loading. The information listed here can only be used for retrospective purposes, outside of VIOL 3 (Image 5).
Image 5

Locations of transportation in transportation details
In the next situation, places for transport must be indicated (Image 6).
- Startplats transport (Starting point transport) - is the depot from which the delivery was picked up or a pick-up point at the industry from which the delivery was collected. This information is inherited from Leveransuppgifter (The Delivery details) that was filled in when reporting the time of delivery.
- Viaplats transport (Via Transport) - Here you will specify Mätplats (The Measurement site) where the transport is measured, this will be filled in automatically.
- Slutplats transport (Final location transportation) - The reception point to which the transport is to be delivered.
- Avlastningsplats (Unloading site) - At an industrial site, there may be more than one place where the timber can be unloaded. If an unloading location is selected, the transport cost calculation can retrieve the distance between the receiving point and the unloading location. This distance is added to the Krönt vägval (Crowned route) distance, ensuring that the transport compensation is calculated correctly.
Image 6

Avstånd och väg (Distance and route)
In Avstånd och väg (Distance and route), there are several information that must or can be entered in order to enable Transportprisräkning (Transport price calculation) to be carried out in Biometria's VIOL service (Image 7).
- Bärighetsklass (Carrying capacity class) - Specifying the load-bearing class is a mandatory task. The bearing capacity class refers to the public road network and has four classes, BK1, BK2, BK3 and BK4.
- Bärighetsklass Norge (Carrying capacity class Norway) - Transports that cross the border allow you to specify the most limited carrying capacity class in Norway.
- Returavstånd (Return distance) - If the delivery is a return, return distance can be specified in this mode. Stated in kilometers.
- Framkomlighetsklass (Accessibility class) - Here it is stated whether the road is possible to drive on in different types of Vehicle combinations.
Klass 0 - God framkomlighet för trailerekipage (Good accessibility for vehicle combination)
Klass 1 - God framkomlighet för lastbil med släp (Good accessibility for truck with trailer)
Klass 2 - Begränsad framkomlighet för lastbil med släp (Limited accessibility for truck with trailer)
Klass 3 - Endast framkomlig med lastbil (Accessible only with a truck)
Klass 4 - Ej framkomlig för lastbil (No accessibility with a truck)
- Transportavstånd (Transport distance) - Stated in Kilometers. This driver-specific distance can form the basis for transport price calculation, but can also form the basis for information that can later lead to a correction of a transport distance.
- Kommentarer (Comments) - Is a free text field. The idea is that if a transport distance is stated that is very different from the distance stated in the Transport Instructions, a Driver should be able to explain the reason why the transport distance stated differs from what is communicated in the Transport Instructions. For example road construction, broken bridge or spring thaw.
Image 7

Loading, transport and unloading
There are more possibilities in this new Solution to specify properties on a transport, codes that are specific to different actors have been removed and replaced with plain text. The following characteristics of a transport can be specified:
Försvårad lastning (Difficult loading). If there are circumstances that make loading more difficult, the following can be stated:
1 - Difficult conditions at pick-up
2 - Seems badly placed
3 – Small batches
4 – Own loading with borrowed forklift
Omlastning (Transhipment). If a transshipment has had to be made, for example, to enable driving on a BK2 road, over a bridge or similar, the following can be stated:
1 – Transshipment of car to trailer, temporarily poor conditions
2 – Reloading of car to trailer, inadequate conditions at the pick-up point
3 – Transshipment of car to trailer, semi-full trailer
4 – Restrictions on public roads
5 – Tunneling to a passable road
Försvårad transport (Obstructed transport). If there are characteristics that make transport more difficult and make it take longer or consume more fuel to carry out the transport, the following codes can be indicated:
1 – Poor road conditions
2 – Specifically ordered route choice
3 – Route through big city
Extra tidsåtgång (Extra time). If a transport has taken longer than expected, extra time can be specified, in minutes.
Färjeöverfarter (Ferry crossings). If there are ferry crossings, the number of ferry crossings can be indicated.
Avgiftsbelagda vägsträckor (Toll road sections). If the transport has been over toll road sections, the number of such sections is stated here.
Lossning (Unloading). The following characteristics that may give rise to a price adjustment can be specified:
1 – Unloading with your own crane, aggravating circumstances
2 – Unloading with own crane, split loads
3 – Unloading with your own crane to railway
4 – Unloading with your own crane to the ground
5 – Difficulty unloading during random checks
Tidpunkt för lossning (Time of unloading). Here it is possible to specify a time for unloading, it can be used for follow-up.
Slutkört (Out of sersvice) It is possible to enter end-of-run codes, those that were entered when entering delivery details are inherited here. The following codes can be entered:
1 – All trade assortments out of contract items
2 – Retail assortment out of contract items
3 – Retail assortment out of outlays
4 – Retail assortment out of contract objects, forwarding remains
5 – End of trade assortment, forwarding remains
Tillgänglighetsklass (Accessibility class). Here it is possible to specify the accessibility class on the most restrictive part of the route, the following can be specified.
1 – Truck traffic all year round
2 – Lorry traffic all year round, except in severe spring thaw
3 – Truck traffic all year round, except during severe spring thaw and persistent rainy seasons
4 – Lorry traffic mainly during the winter months
Beordrad helgkörning (Ordered weekend driving). There is a Ja (Yes) and Nej (No) button that can be filled in. If the weekend driving is ordered, the yes button can be filled in. If a transport is carried out on a weekend and there is an ordered weekend service, such a supplement can be paid if it is included in a price list. It is important for you as a Driver to know if the ordered weekend driving is expected to be filled in to receive the weekend bonus.
Image 8

Transportresurs (Transport resource)
A transportation resource is a resource of type that was previously paid based on Transportörsnummer (The Carrier number) that performed the service. Since the carrier numbers no longer exist, one or more transportation resources can be selected to handle the charges that may fall on the transportation resource. As a driver, you must been told by your transport manager whether you should specify one or more transport resources.
The transport resources that can be specified are:
- Andelsbil (Cooperative car)
- Ej andelsbil (No cooperative car)
- Ingår i projekt (Included in projects)
- Ingår i treskift (Part of three shifts)
- Marginalresurs (Marginal resource)
- Ny chaufför (New Driver)
- Resurs geografiskt flexibel (Resource geographically flexible)
- Resurs vid brand (Resource in case of fire)
- Resurs vid storm (Resource in case of storm)
- Resurs vinter (Resource winter)
- Resurs utökat ansvar (Resource increased responsibility)
Image 8

External references
Information about external references is visible here if available. You are not able to change the information (Image 1).
Image 1

Click Slutför (Finish) to exit the Transport details view. A dialog box will appear. (Image 2) Click Slutför (Finish) to finish.
Image 2

Delivery opportunity without transport details
No transport details
The driver is expected to announce a Nytt leveranstillfälle (A new delivery opportunity) when loading the vehicle combination, preferably already at the end of the truck, even if no Transportuppgifter (Transport information) is to be provided.
If no transport information is provided, no information about the transport is sent to the VIOL system, and no transport report can be carried out. The choice to report a delivery date without transport information should only be made if the Driver is sure that no transport information needs to be collected and will be used by other parties, e.g., for transport price calculation outside Biometria.
It is not possible to add transport information on a delivery opportunity in the VIOL 3 Business system afterwards. The delivery date will need to be cancelled and a post-registration with transport information.
If you do not want to provide any transport information, click on Lämna inga transportuppgifter (Do not provide transport information). See image 1.
Image 1

A dialogue box will appear (Image 2). Click Ja, Lämna inga (Yes, Leave None).
Image 2

Complete Delivery Opportunity, Today's Completed Deliveries, and most recently Completed
You need to Slutför leveranstillfälle (Complete delivery opportunity), when all steps are completed and any printouts for random sampling and test stacks have been printed. You do this by clicking on the line Slutför Leveranstillfälle (Complete delivery opportunity). See image 1 below.
Image 1

The delivery time ends up on Dagens slutförda avlämningar (Today's completed deliveries). See image 2.
Image 2

Under Dagens slutförda avlämningar (Today's completed Deliveries), it sorts at the top of the list by the latest time. As well as the date when you reported arrival at the Measurement site.
If you make the drop-off after midnight, you started the delivery before 12:00 and finished it after 12:00, you will not see it on "Today's completed Deliveries" because that delivery time ends up on "Last completed deliveries," which is a history.
Under Dagens slutförda avlämningar (Today's completed Deliveries) you will see all the vehicle combinations that you have added to under Mina ekipage (My Vehicle Combinations).
If you want to see older deliveries, you can click on Dagens slutförda avlämningar (Today's completed deliveries). See image 3.
Image 3

In Senaste slutförda (Last completed) you will see deliveries that have been made by Vehicle combinations that are posted under Mina ekipage (My Vehicle combinations). See image 4.
The icons that are green and marked with a green checkmark are possible to open and look at.
Image 4

You have the opportunity to apply at the vehicle combination level (Image 5).
Select a character and then use the arrow keys to move up or down the list.
Image 5

Leveranskvitto (Delivery receipt)
Earlier the delivery receipt was called Measurement receipt, but since most deliveries have not been measured yet when the measurement receipt is printed, it is renamed in VIOL 3 to Leveranskvitto (Delivery receipt). This contains relevant information about the delivery.
You can print out a Preliminärt leveranskvitto (preliminary delivery receipt) during the drop-off process (Image 1). A preliminary Delivery receipt will not be sent to an email address.
Image 1

When printing, select the printer at the Measurement site (Image 2).
Image 2

This is what a final measurement receipt can look like (Image 3).
Image 3

When the drop-off process is complete, Slutgiltigt leveranskvitto (a final Delivery receipt) arrived (Image 4).
Image 4

When the receipt has the status of Slutgiltigt leveranskvitto (The Final Delivery receipt), it will be sent to one or several email addresses if ordered.
Leveranskvittot (The Delivery receipt) will be sent to the e-mail address that is posted on the Utförande transportföretaget (The Carrier) in VIOL 3's operator register.
In settings, the driver can choose whether the Delivery receipt should be sent to the email address that the Driver uses in Chaufförsklienten (The driver client).
Once a Measurer has pressed the key and reports Ankomst till mätplats (Arrival at the Measurement site), a final delivery receipt will not be sent to the driver's email address. However, it will be sent to Utförande transportföretags (The Carrier) email address.
It is only when the Driver presses the key himself that Leveranskvitto (The delivery receipt) will be sent to the driver's email address.
When the Delivery receipt arrives on an email, it looks like this (Image 5).
Image 5

Each delivery becomes its own receipt. In the image, there are two deliveries to the same Measuring site that are loaded onto the same Vehicle combination (Image 6).
Two delivery receipts will be created with different unique Leverans ID (Delivery IDs). Both receipts will have the same Leveranstillfälle ID (Delivery opportunity ID) to keep both deliveries together.
Image 6

Driver-approved measuring (Previous MAPP)
Previous MAPP measurement will now be performed in Chaufförsklienten (The Driver Client).
Utförande transportföretag (The Carrier) you have chosen when logging in will be Mätande företagsombud (The Surveying Company agent). If you drive for several transport companies, it is important that you have chosen the right Aktör (Entity) when logging in. In Inställningar (Settings), you can Byta roll (Change roles). Read more in the chapter Select an Aktör (Entity) after logging in.
You can also check which Performing Transport Company is selected by clicking on your name (Image 1).
Image 1

You as a driver will be the measurer. It is important to have a personal log-in to ensure that it is correct in the follow-up.
In MAPP, you chose which measuring company you wanted to perform the measurement for when you logged in. In VIOL 3, you will select this under Komplettera leveransuppfiter (Complete delivery details). See Chapter Komplettera leveransuppgifter - Completing Delivery details. There can be many measuring services that you should choose a Measuring company for.
There is no permission control. If a driver is allowed to perform this, various measurement services will be available to you as a driver.
If the Driver is not allowed to make Travmätning (Stack measurement) of the delivery, you can read Låst: Väntar på mätare (Locked: Waiting for a Measurer). See image 2.
Image 2

If you are allowed to perform Travmätning (Stack measurement of pulpwood), and Skäppmätning (Bulk measurement), the line will be orange and tell you Väntar på åtgärd (Waiting for action).
Image 3

You will be able to choose Skriv vikt manuellt (Write weight manually), if there is a measurement service for you as a driver (Image 4).
Image 4

If there is an existing active scale, it will not be possible to write in weight manually.
Error message when Delivery is notified from a Transport management system
If Leveransavisering (The Delivery notification) is incorrect from a Transport system, you will see this message. See examples in Images 1 and 2.
A validation is done when you press Nyckel ankom mätplats (The key at the measurement site).
In Slutför avisering (Complete notification), (Image 1), you can always cancel your notification and begin again, with the delivery notification in Chaufförsklienten (The Driver Client). You can also submit a new delivery notification from your transport system.
- If there is Ingen giltig mätorder (No valid measurement order), you need to contact your Transport Manager or The Original Logistics Buyer Agent.
- Angiven lastposition förekommer på flera lastobjekt (The specified load position occurs on several load objects). If you have submitted from two different systems, and in both systems noted that the load is on A1, you will receive this error message.
Image 1

Image 2

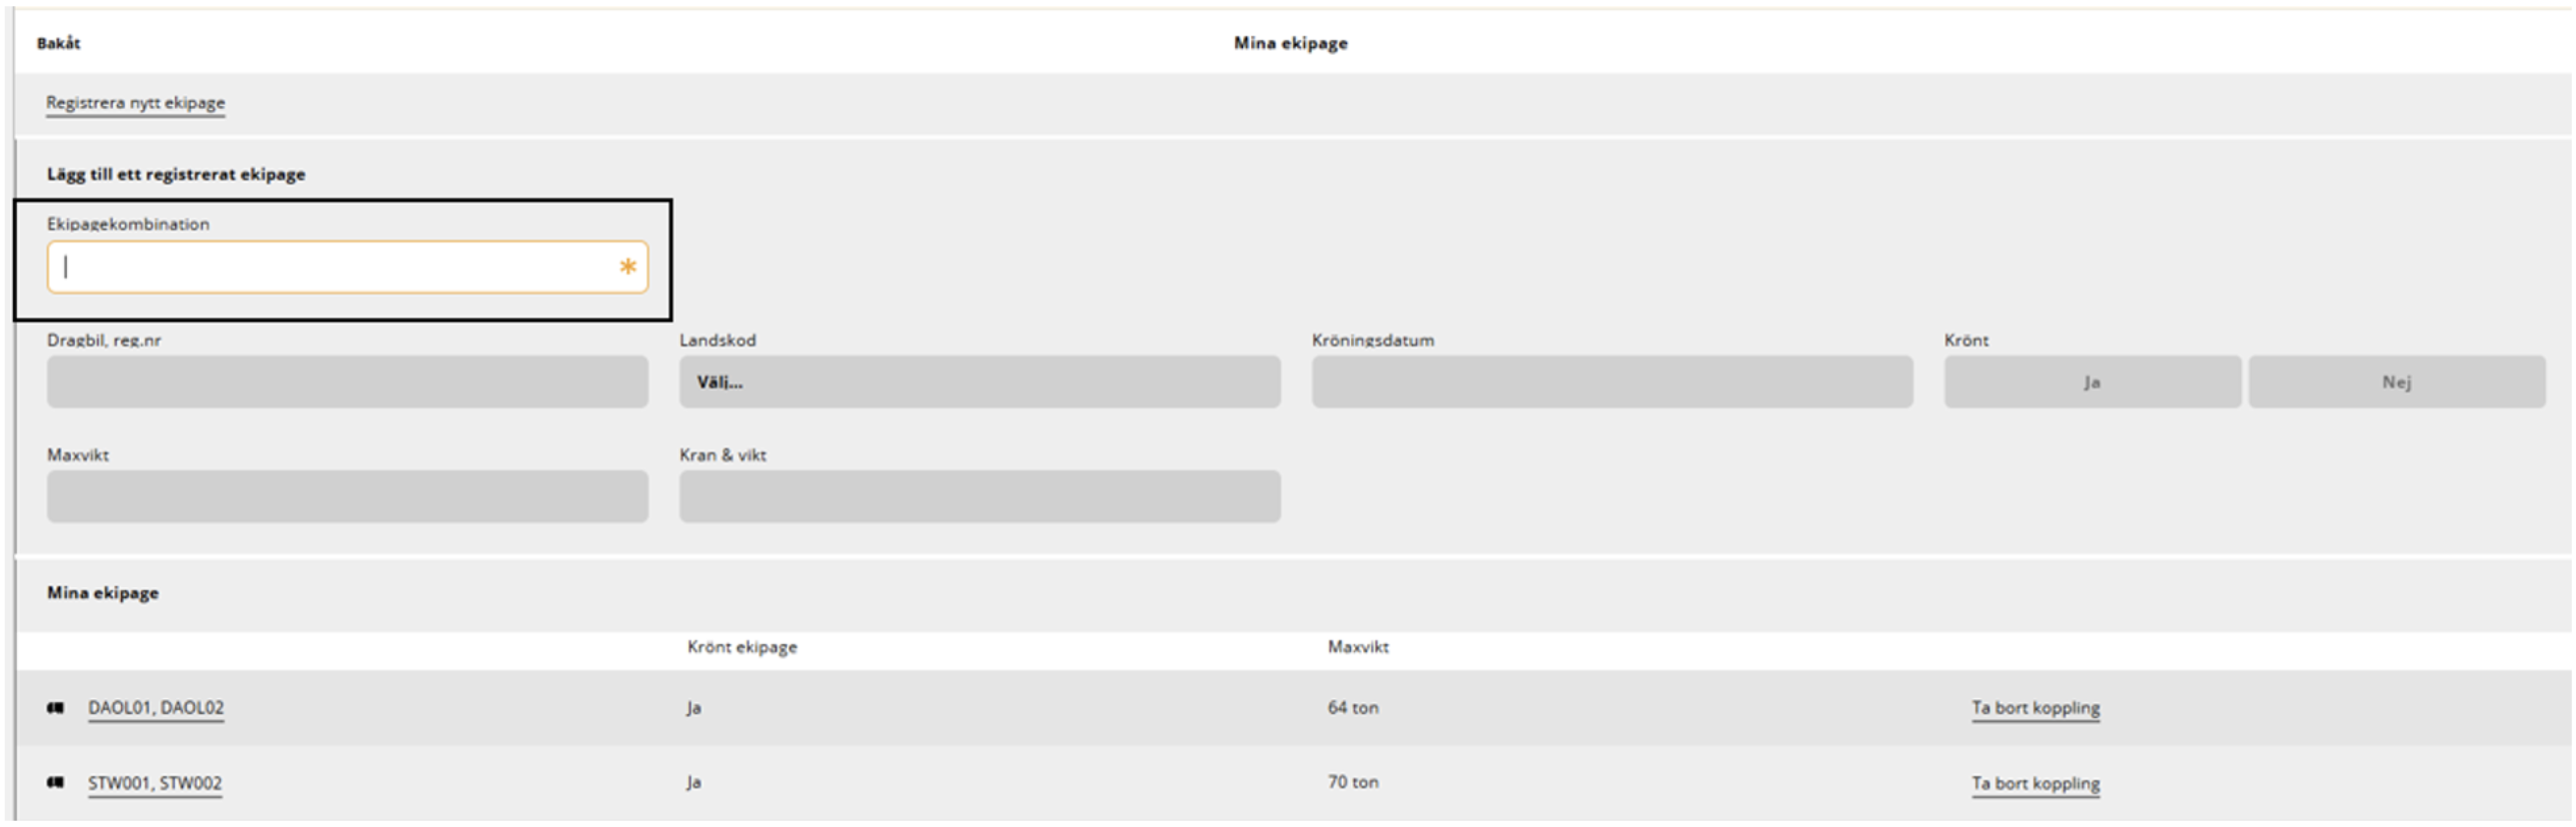
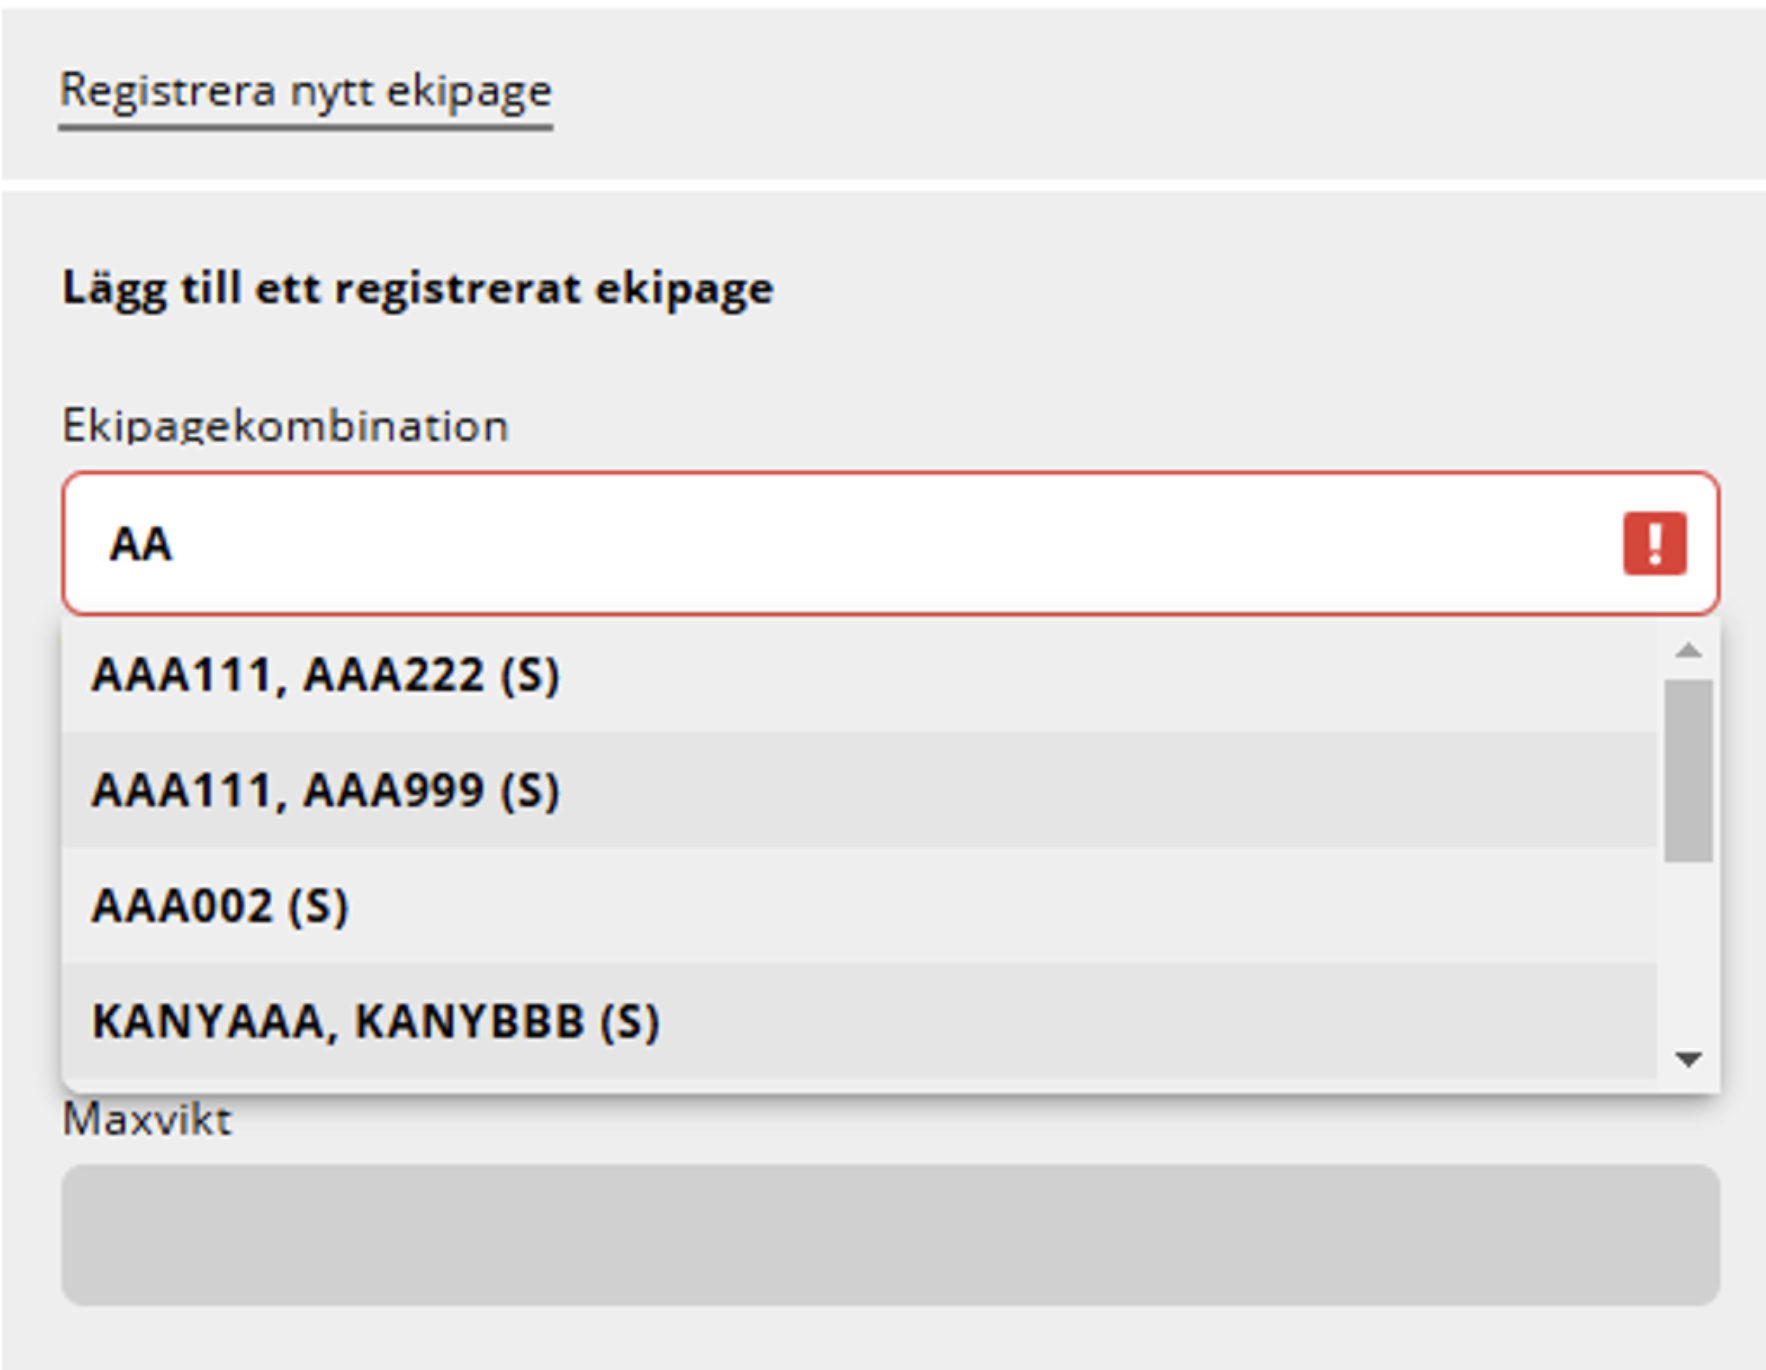
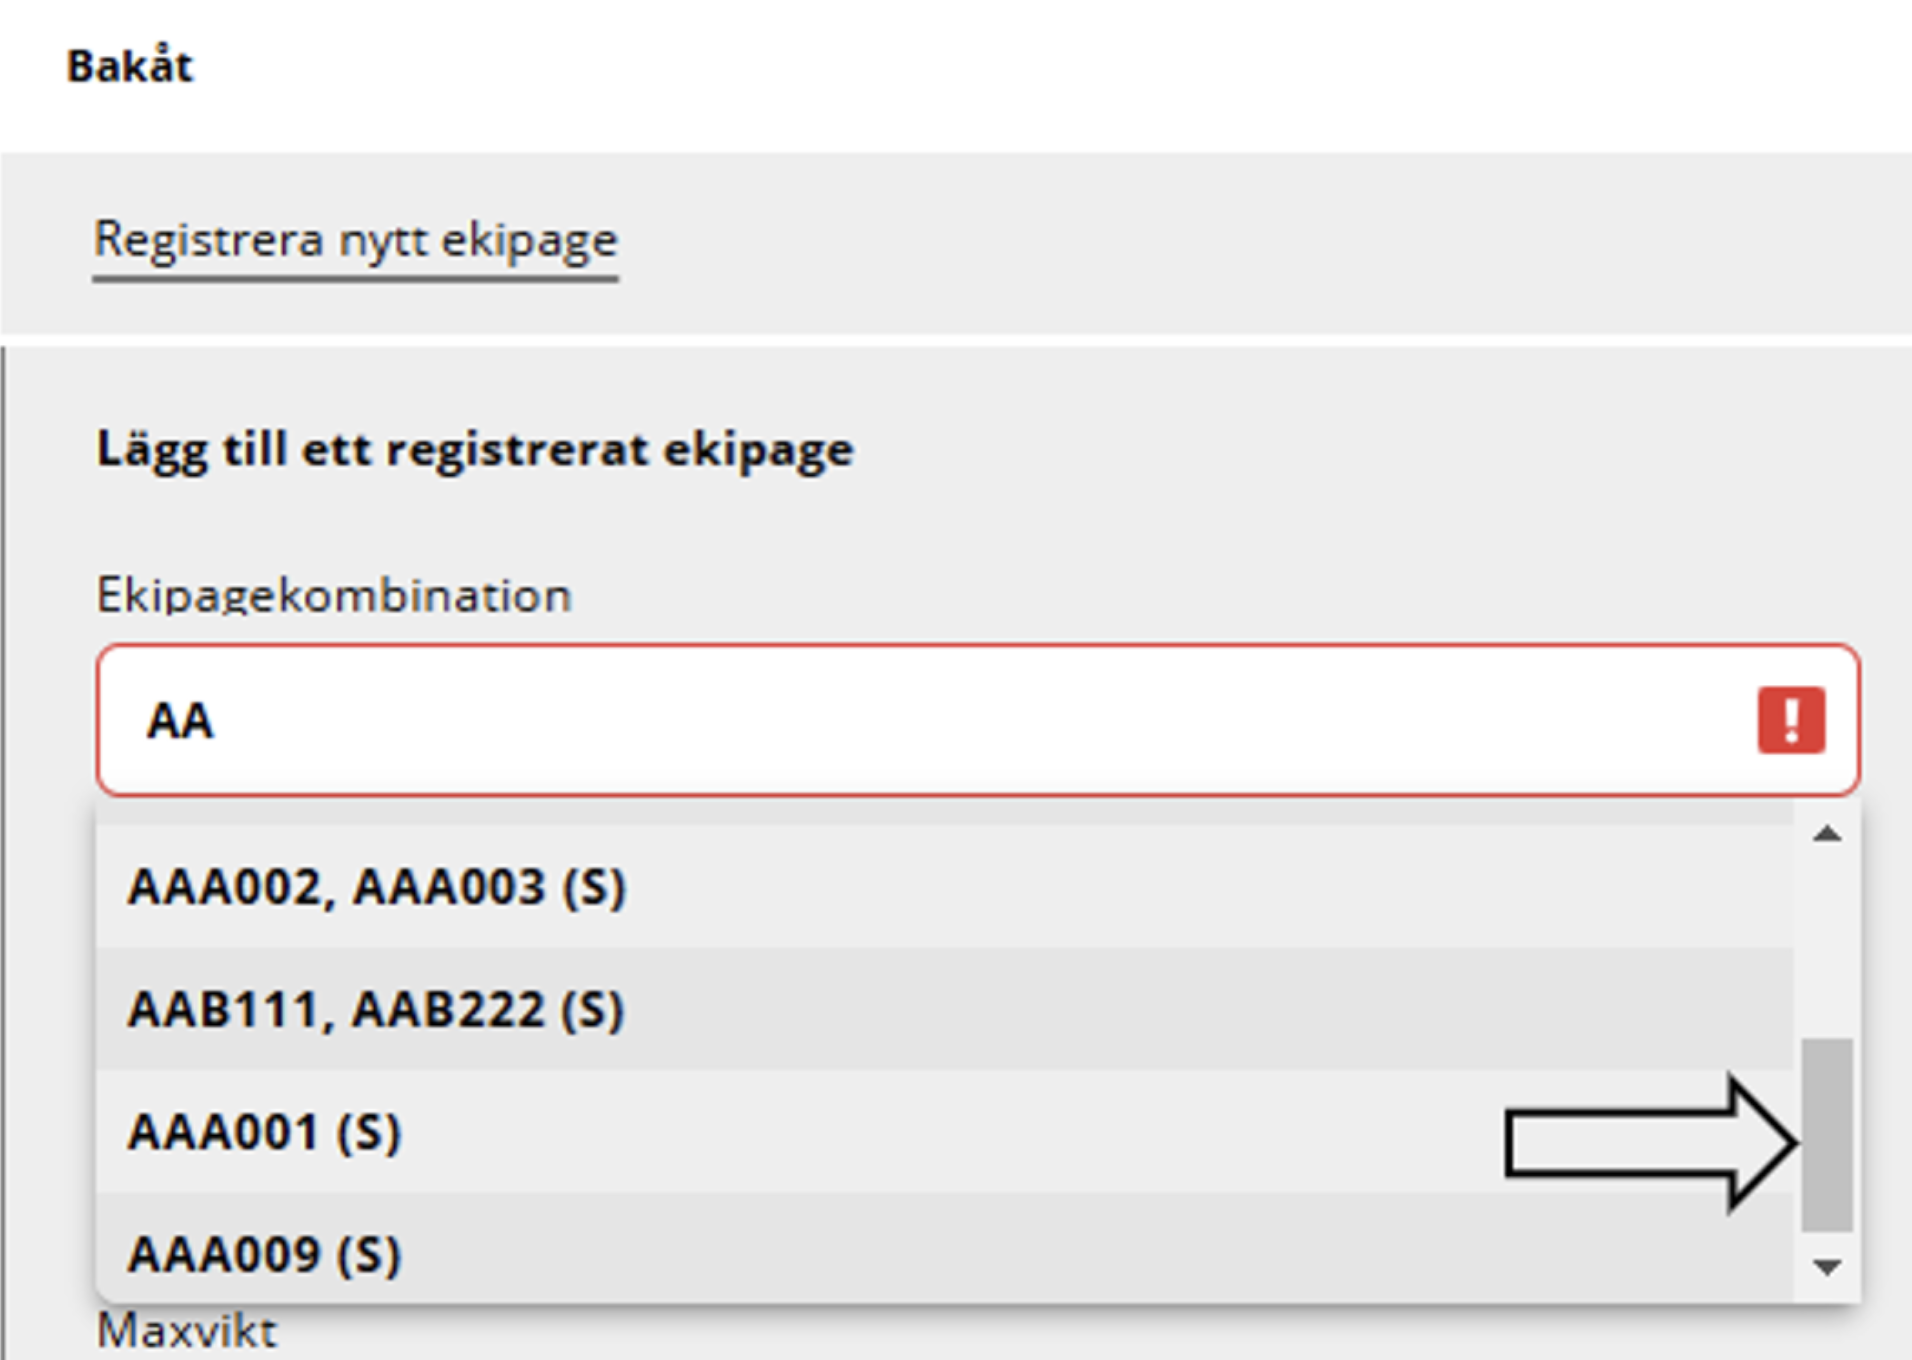
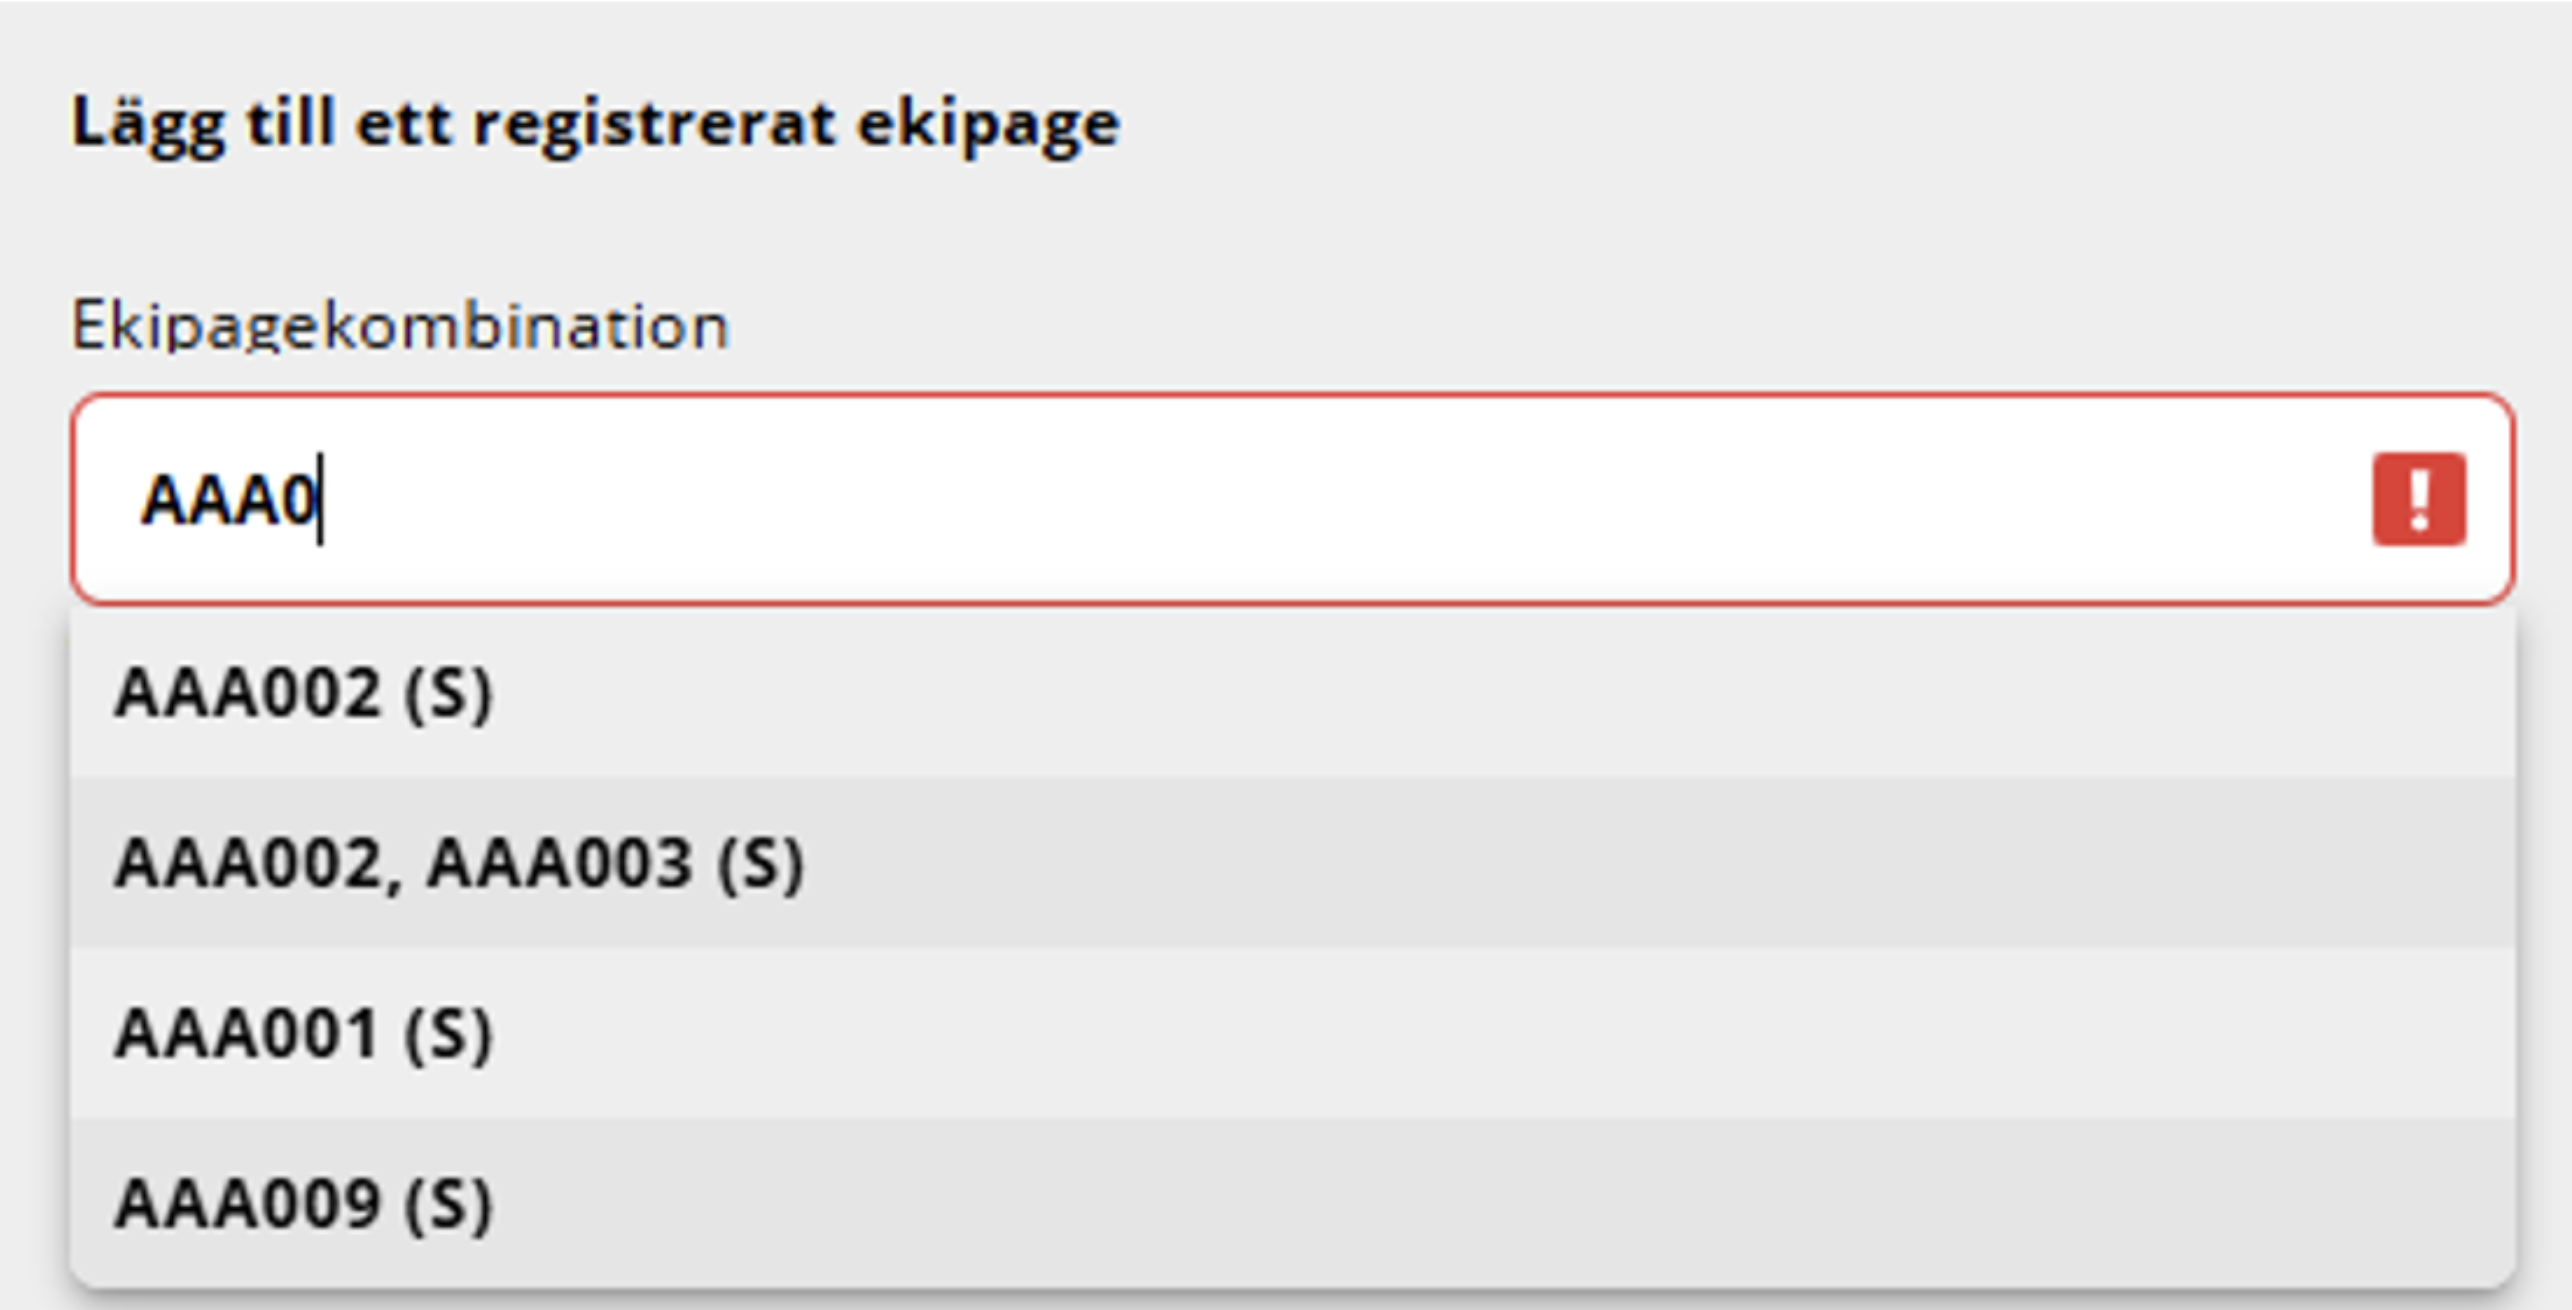
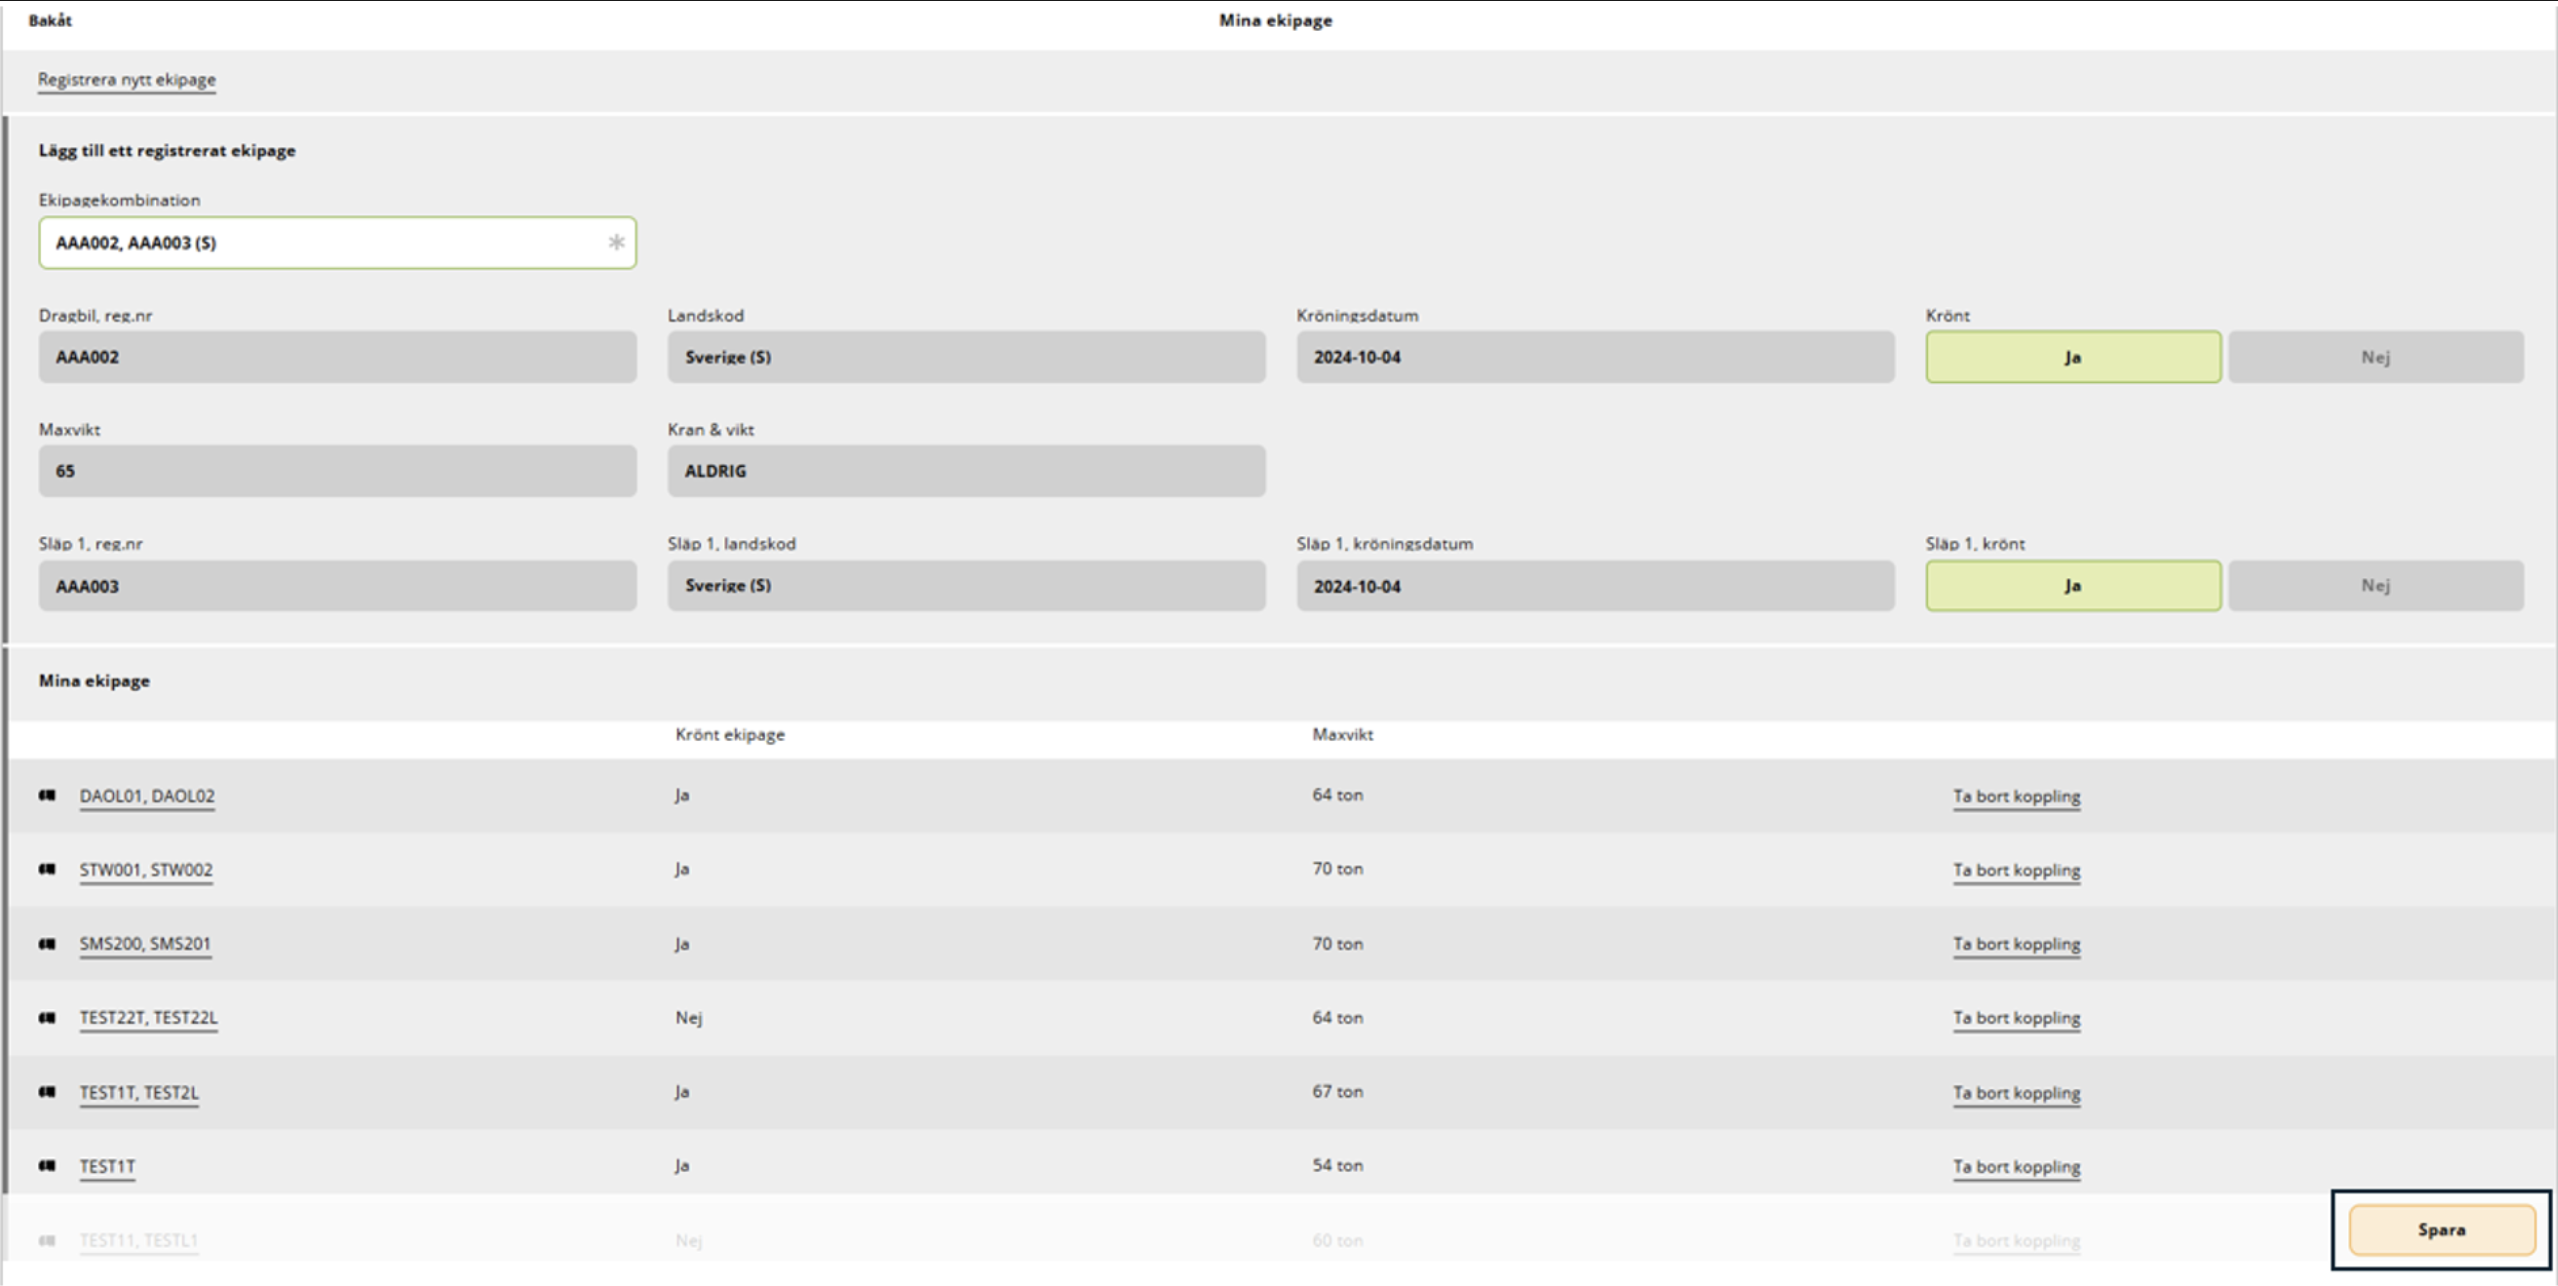
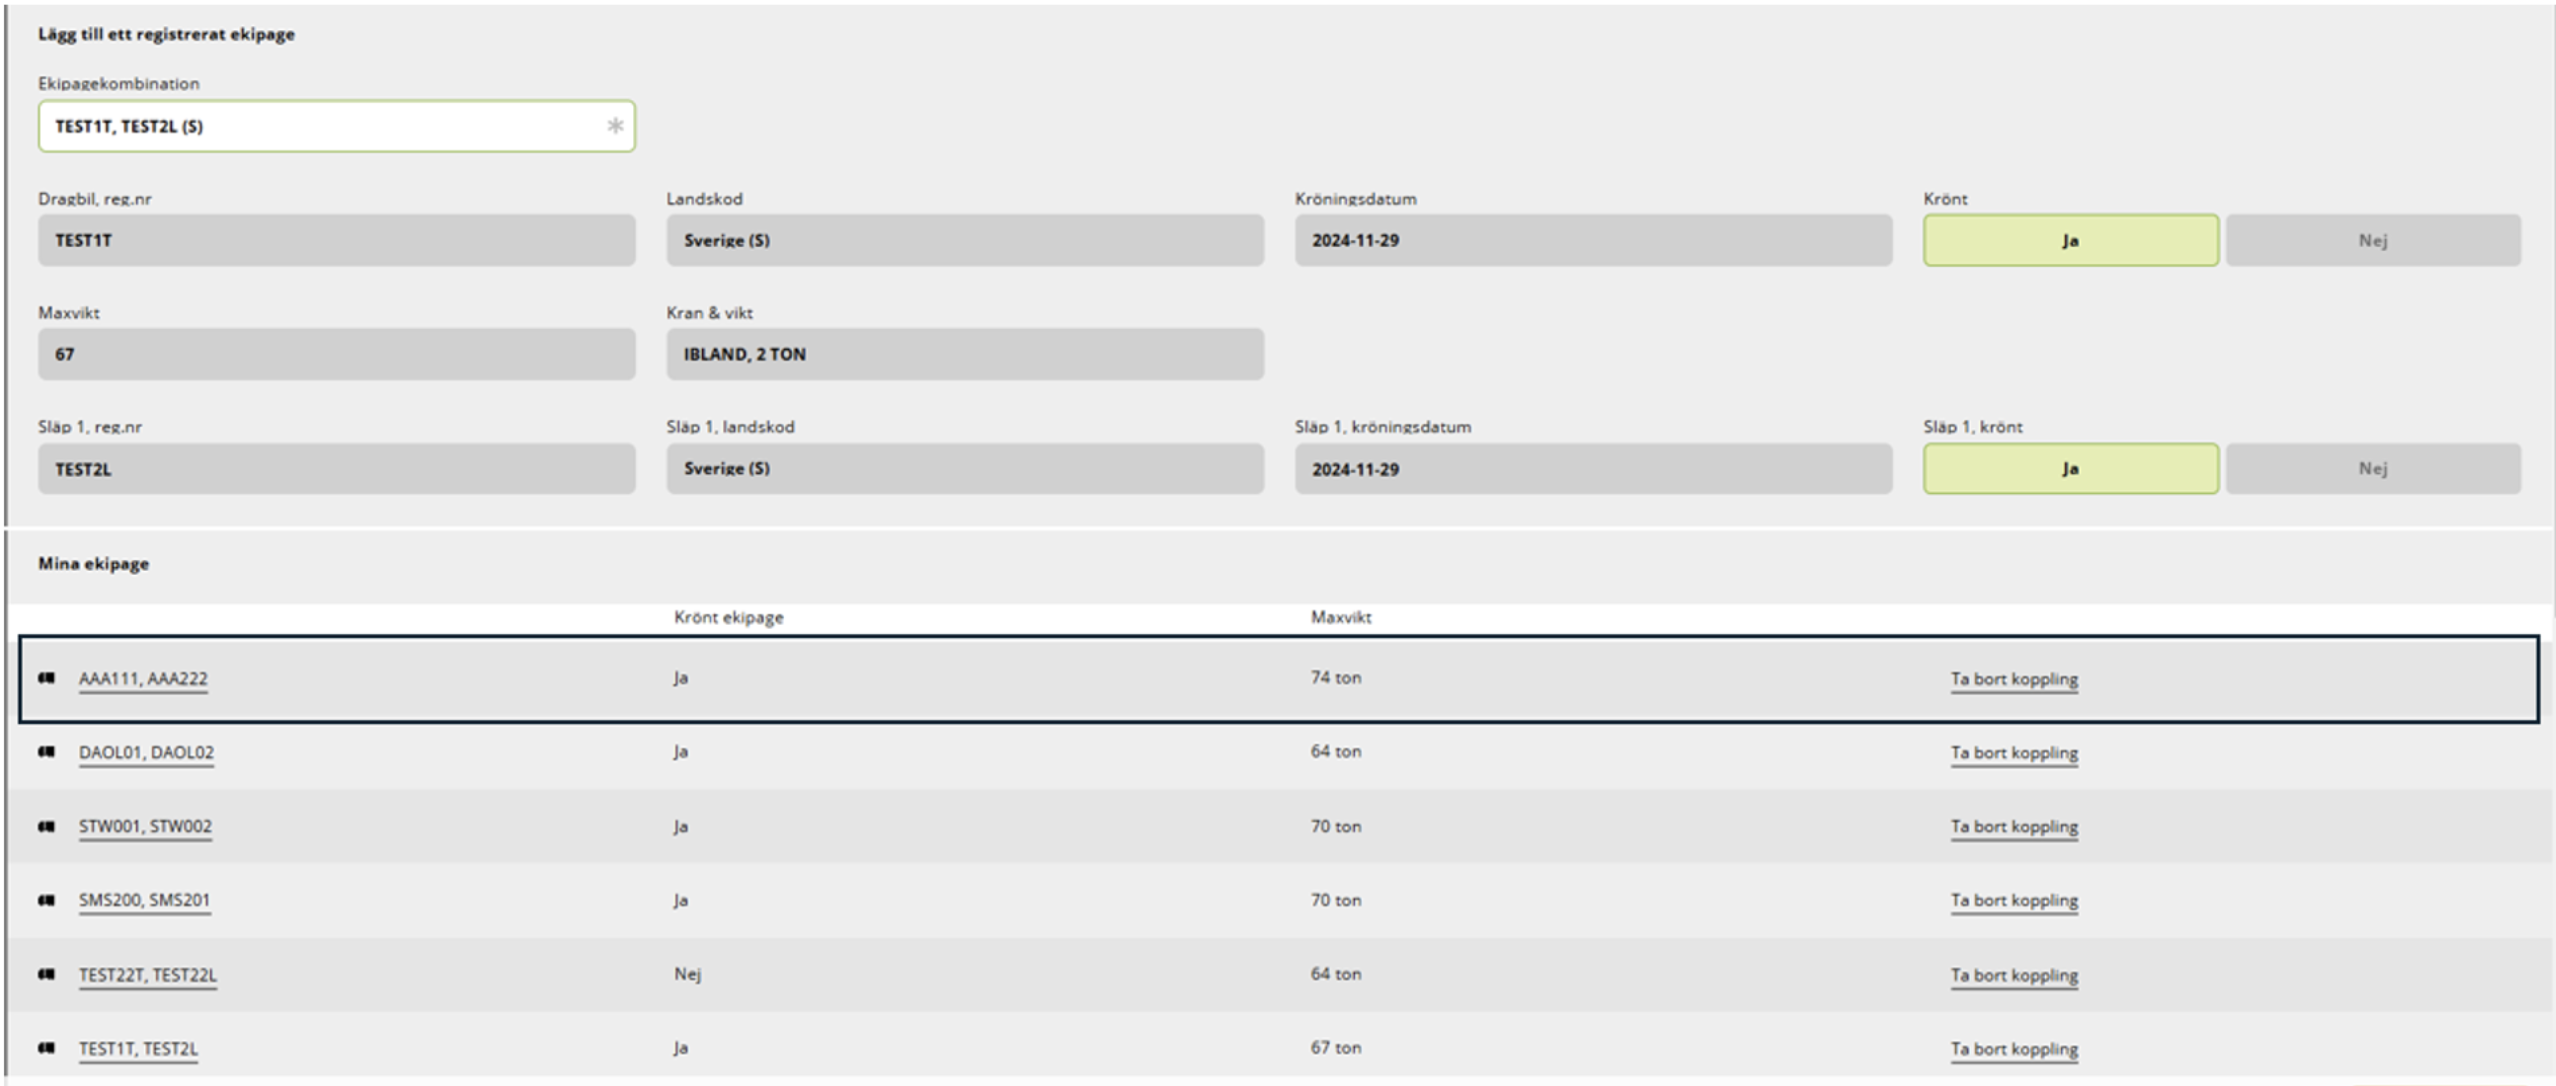
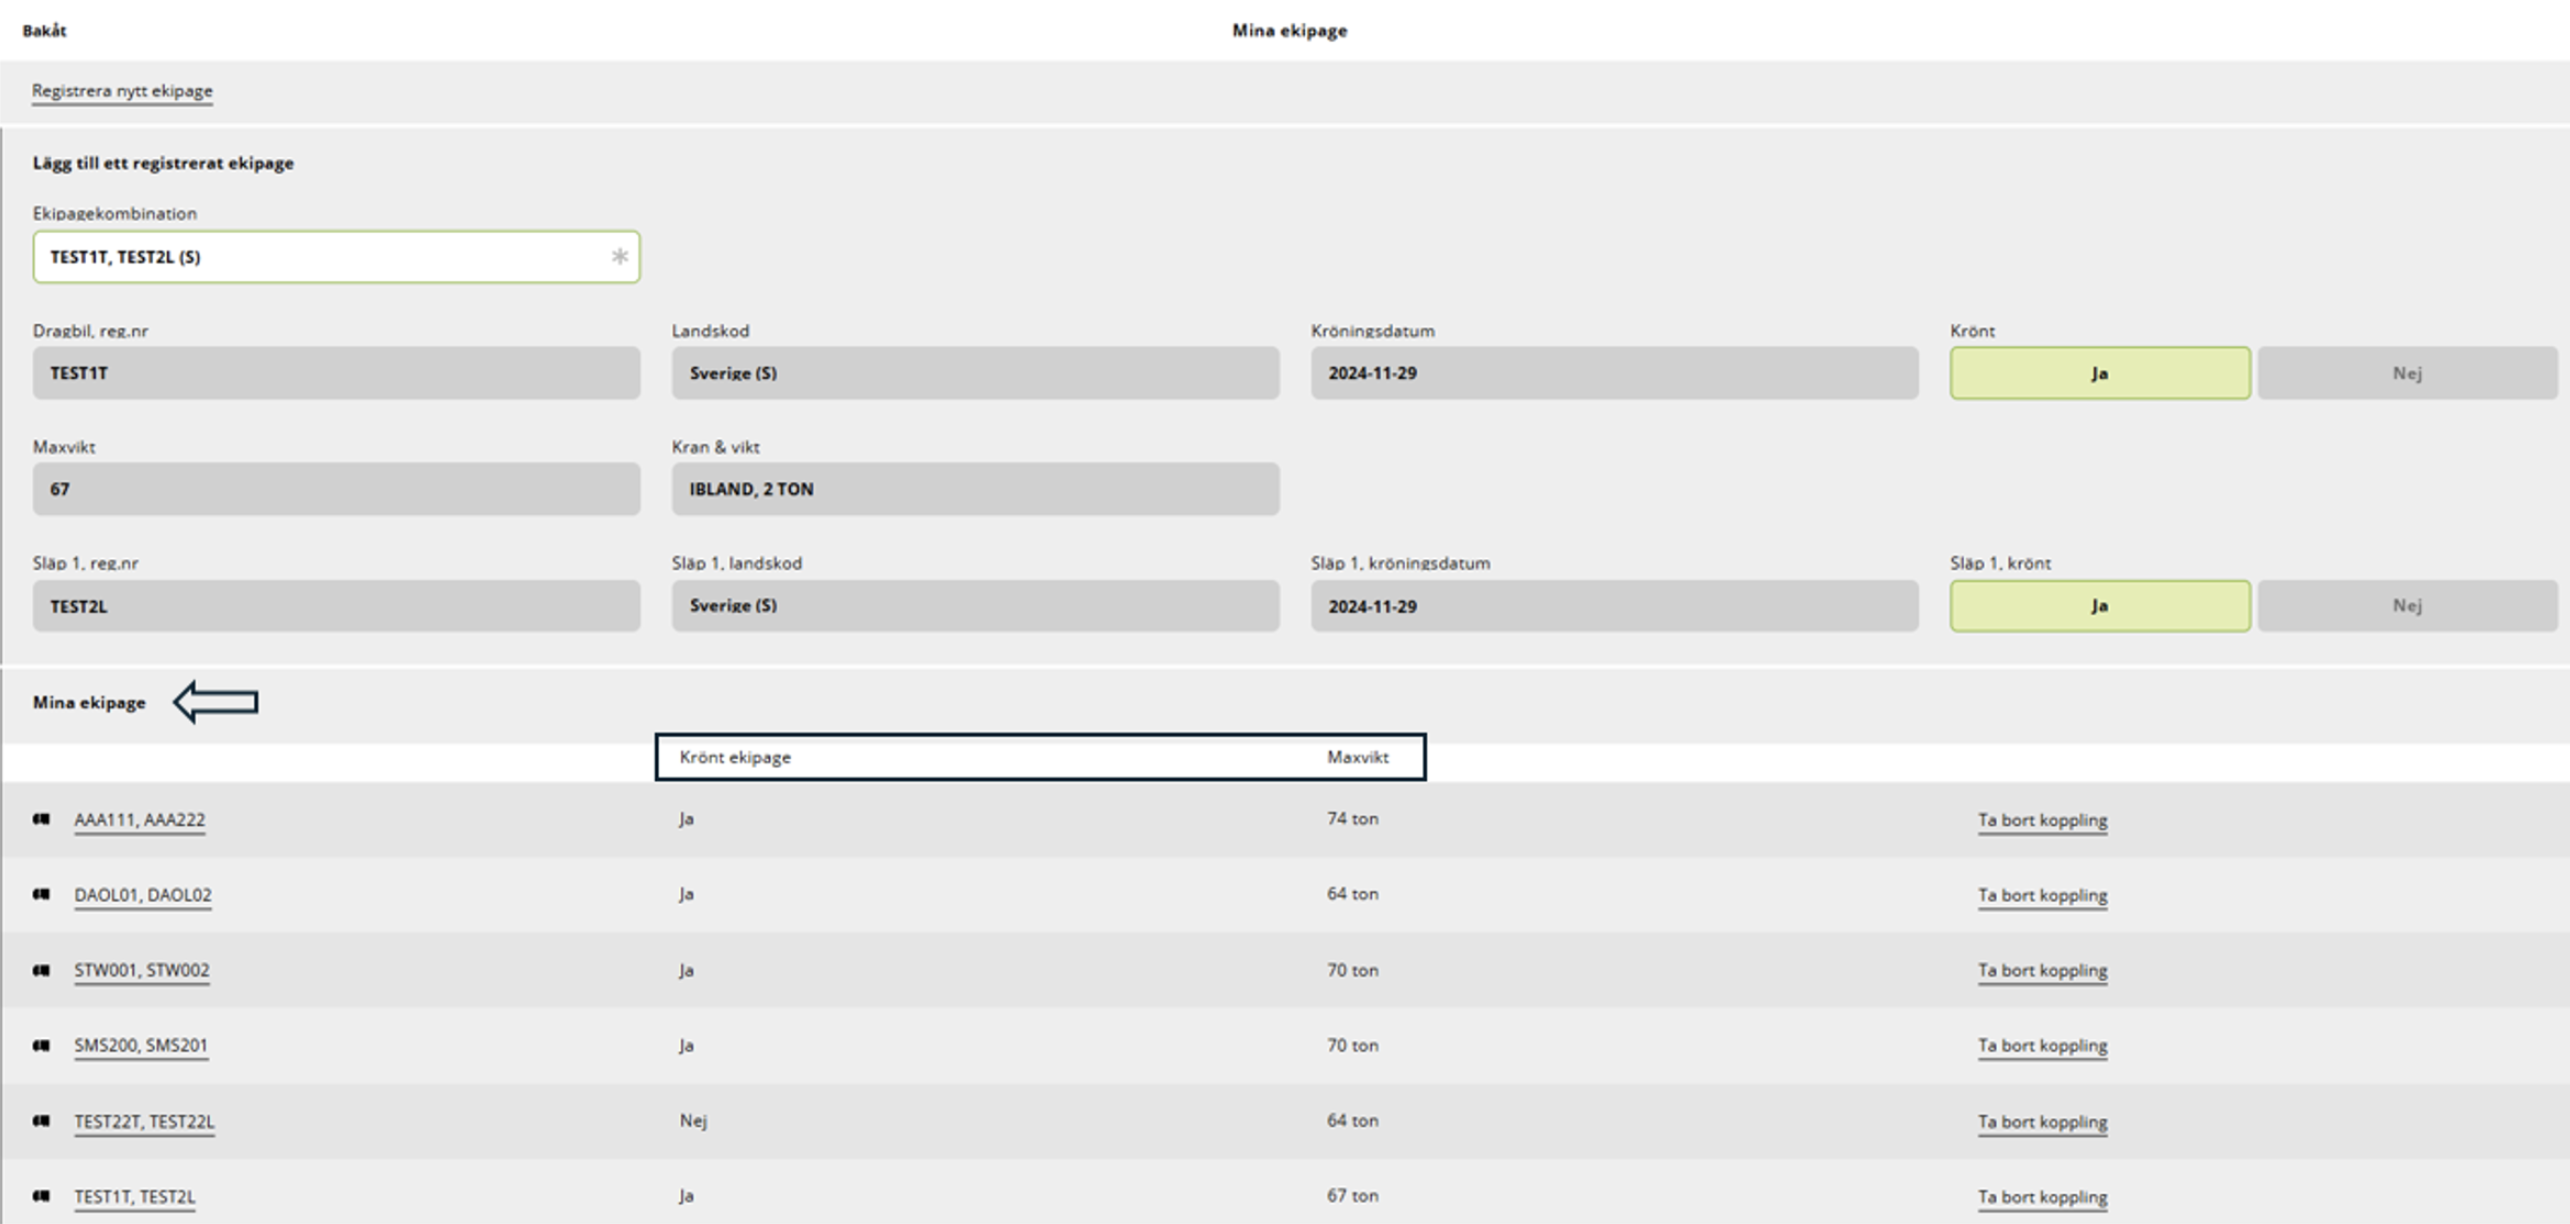
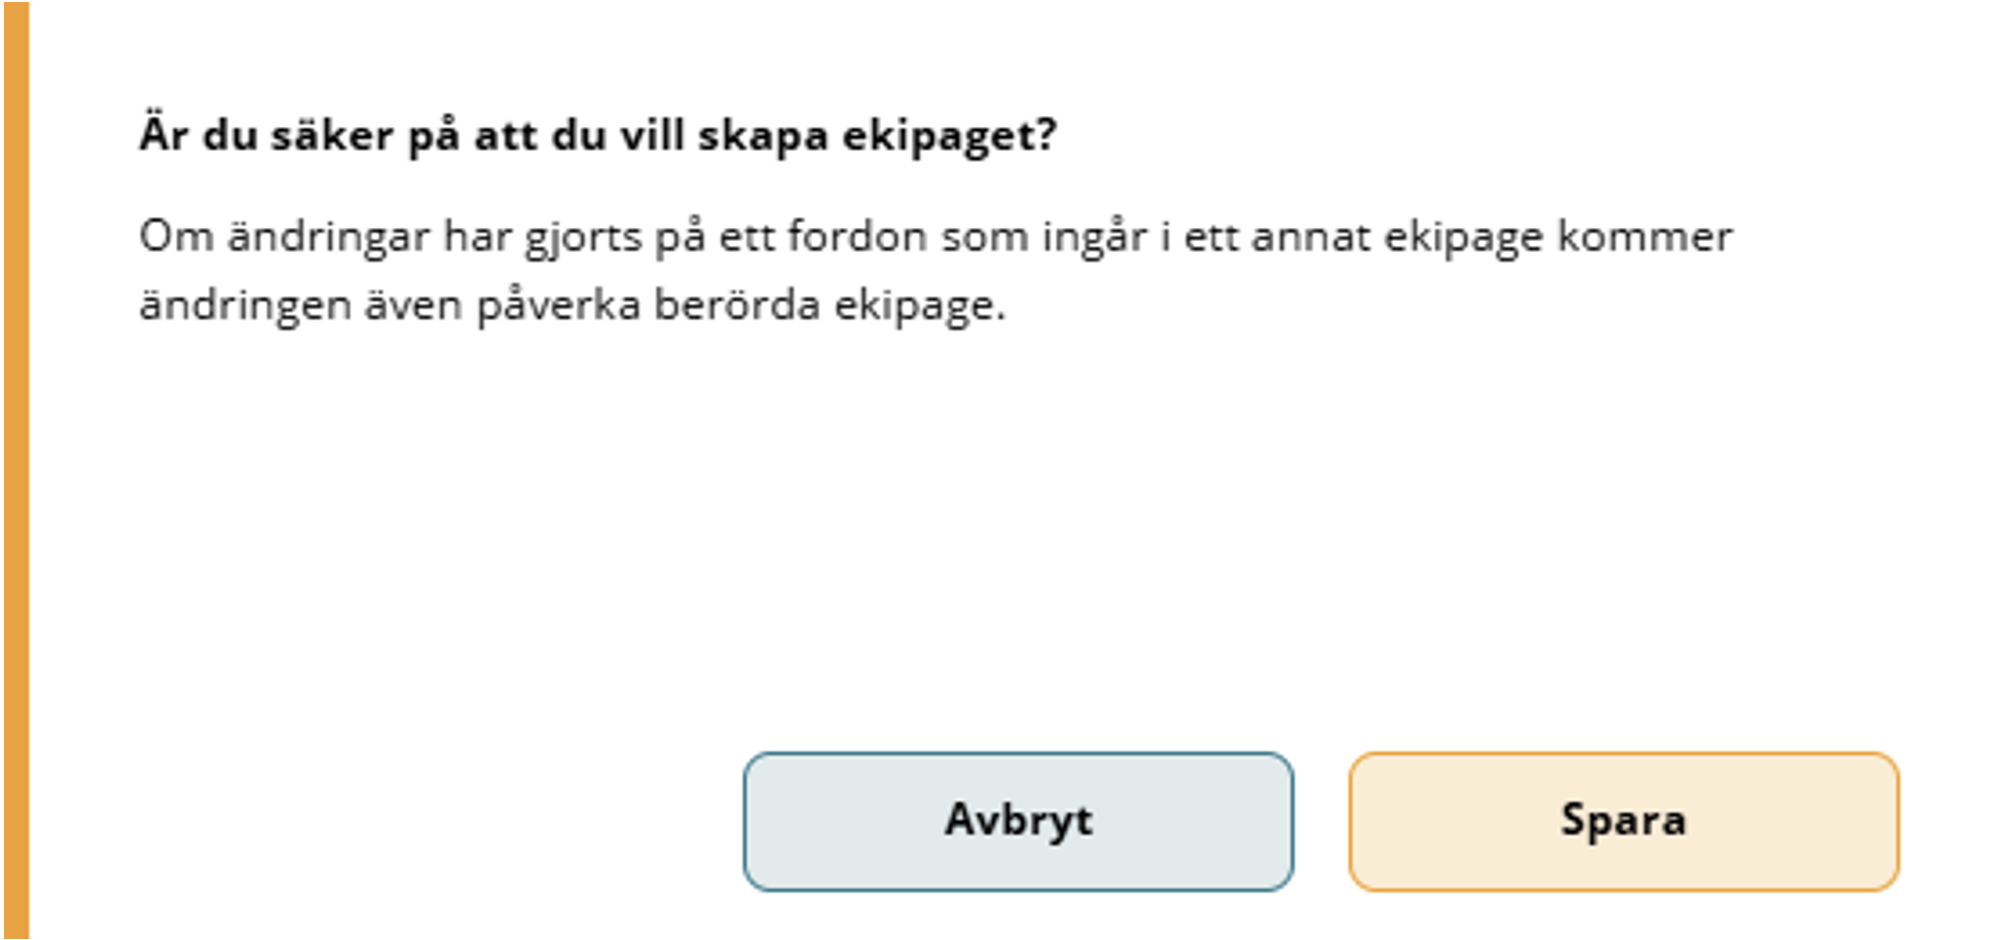
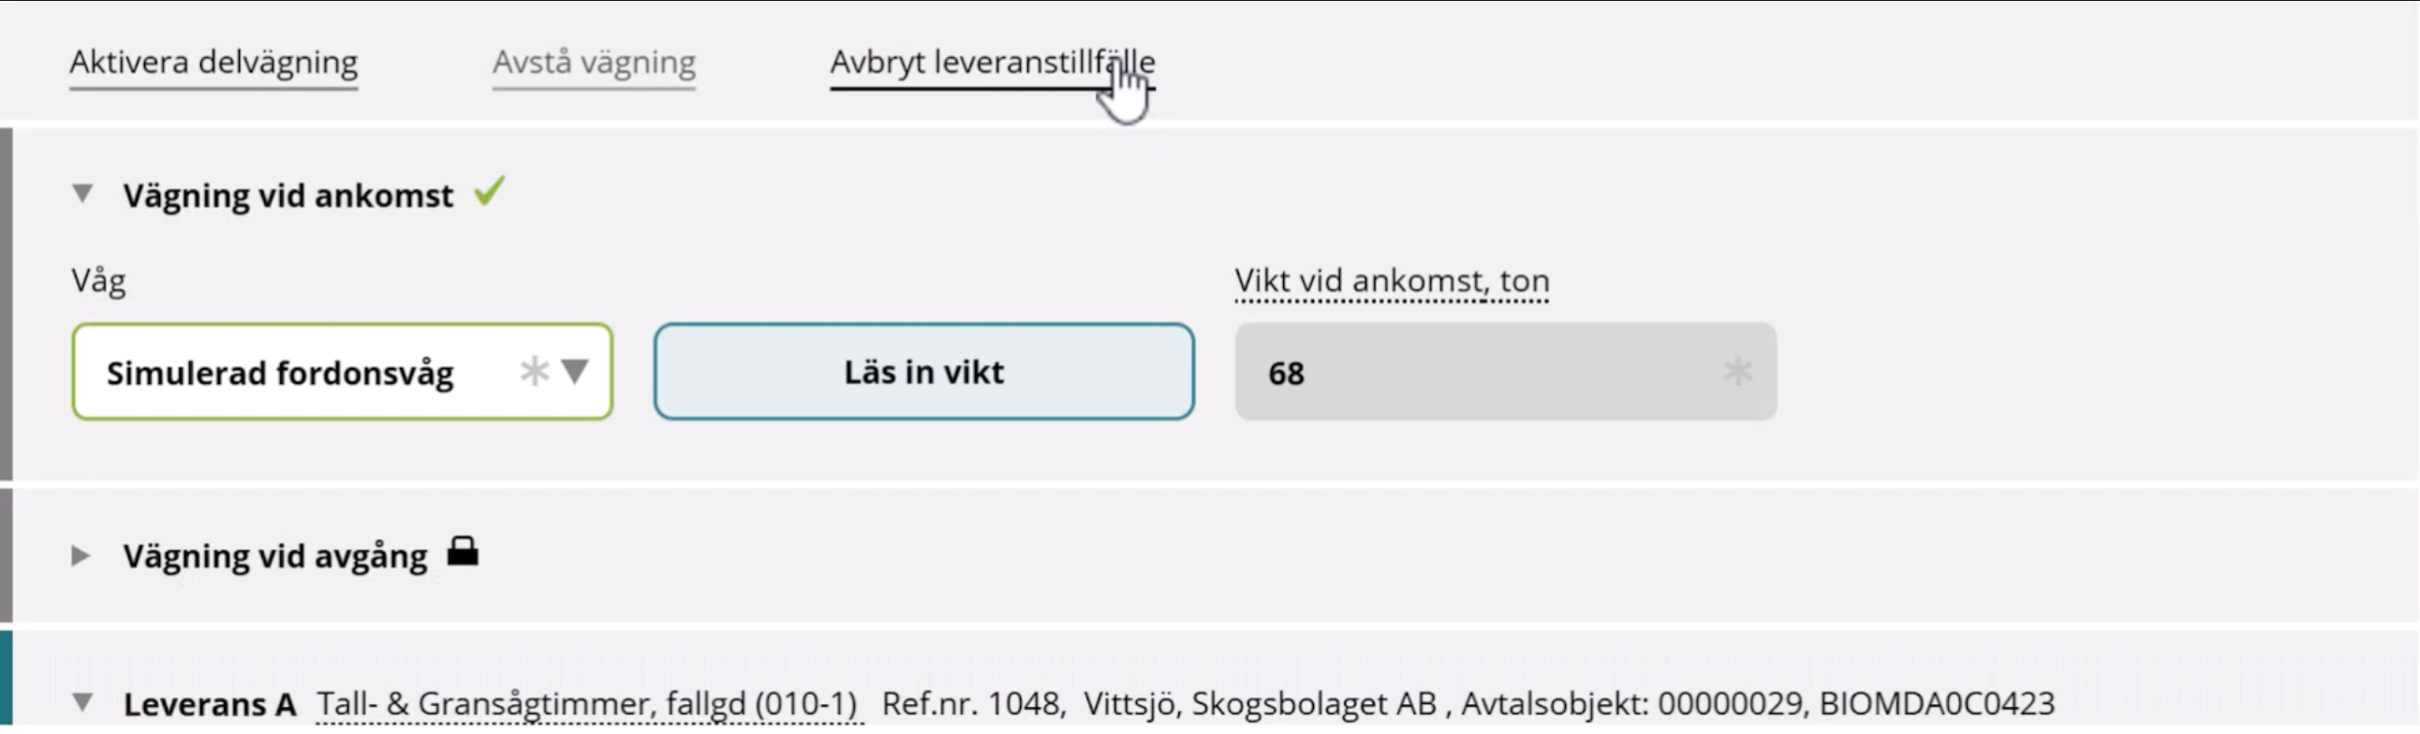
Revisionshistorik
| Ändring | Datum |
|---|---|
| Added a new chapter about Cancel Delivery opportunity. See chapter 18. | 2025-11-18 |
| Dokumentet skapat | 2025-05-02 |
© Copyright 2023 - 2026 Biometria ekonomisk förening. Med ensamrätt.
Innehållsförteckning